Boosting Productivity in Node.js: Harnessing Message Queues for Efficient Task Processing

What do I need this for? 🤔
Hey there! Let's dive into the world of message queues, which are like super-cool order lists for your application. Just imagine you're running a fancy restaurant, and your customers keep placing orders. You can't cook all the dishes at once, right? That's where the magic of message queues comes in!
Think of a message queue as a special list that holds all the customer orders until your amazing chefs are ready to process them. Each order in the queue contains all the details the chefs need to whip up the perfect dish. As customers keep ordering, their requests join the queue, patiently waiting their turn until they get processed.
Now, why should you care about message queues? Well, let me tell you! Using message queues in your application is like having a secret kitchen that works behind the scenes to make everything super fast and efficient. It's like having a chef's assistant who takes care of all the tasks you don't want to handle directly.
Let's say a user registers on your platform, and you need to send them a welcome email. Instead of making them wait until the email is sent, you can add the email task to a message queue and give the user an immediate response like, "Welcome aboard, matey!" The queue then passes the task to a special worker, let's call them the Mail Ninja. The Mail Ninja picks up the task from the queue, uses their super-smart mail-sending skills, and sends the welcome email. Once the email is sent, the task is removed from the queue. Ta-da!
You can refer to the flow diagram below.
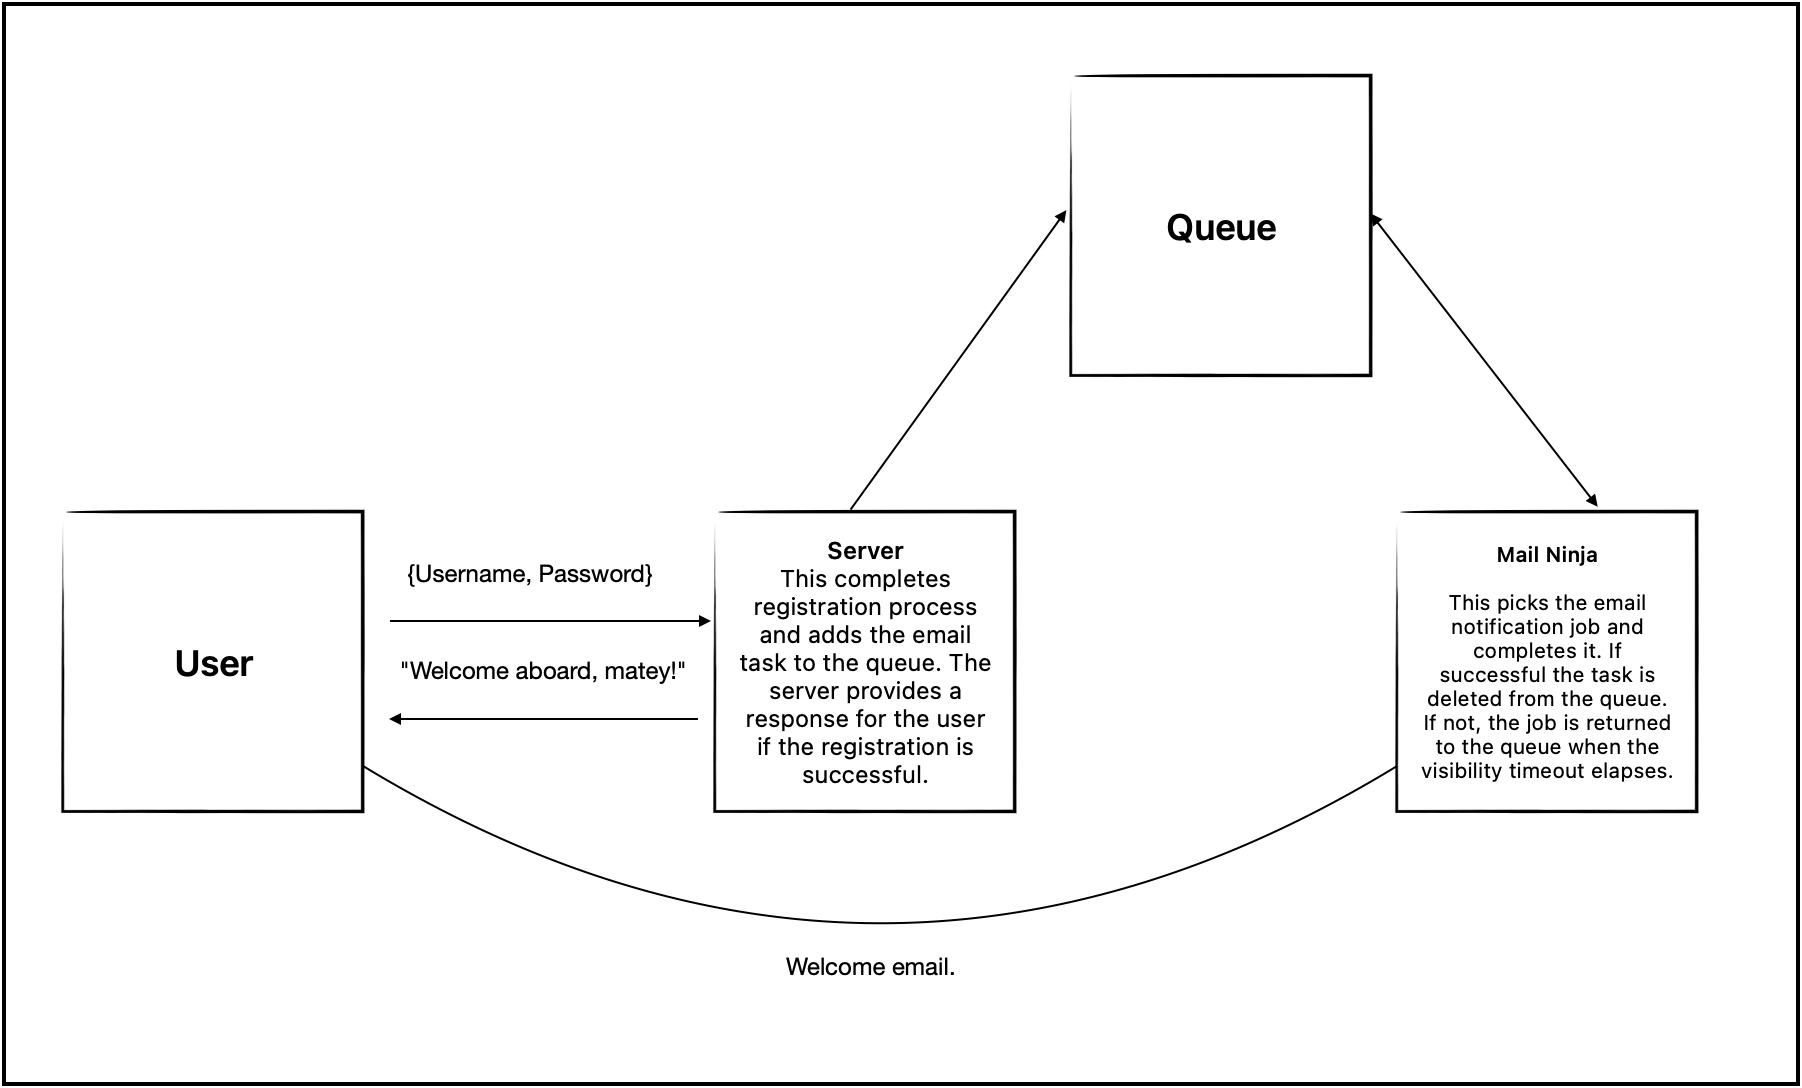
By using message queues, you make your application more responsive, like a well-oiled machine. The user doesn't have to sit around twiddling their thumbs, waiting for the server to finish sending the email. They can continue exploring your awesome platform, while the Mail Ninja works their magic in the background.
Another example! Let's explore more exciting ways to use message queues in your application. Get ready for some image-processing adventures!
Imagine you have a magical worker who can interact with your database and perform all sorts of tasks. Let's call them the Task Wizard. One fascinating use case is using message queues to compress and handle images like a pro.
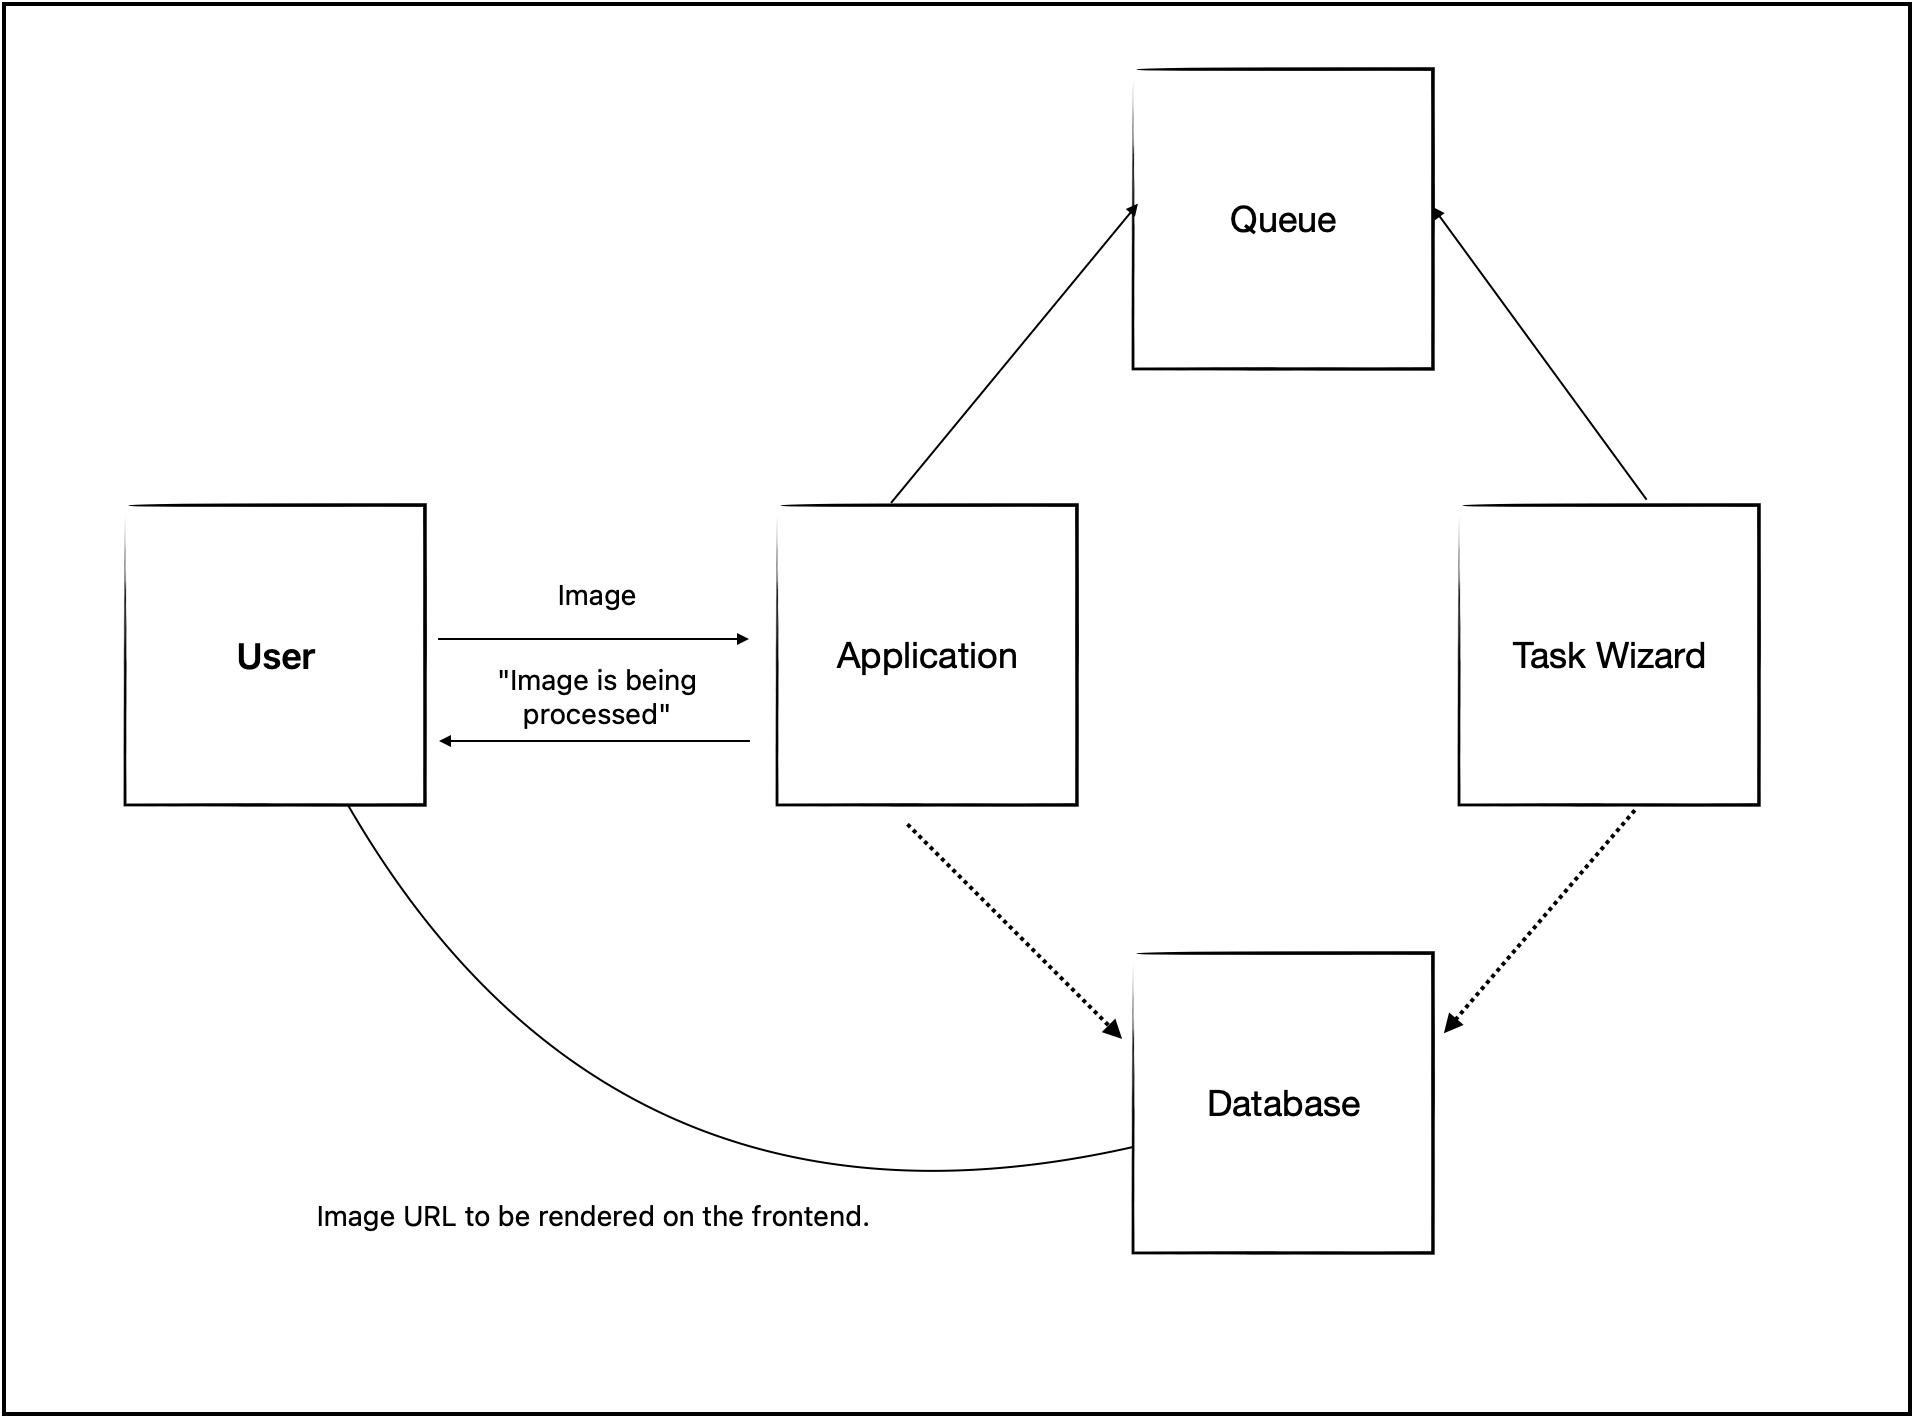
So, here's the story: a user sends an image to your server, and you want to perform some magic on it, like compressing the image and storing it in a fancy cloud storage object. But you don't want the user to wait forever while your server does all the heavy lifting. That's where the Task Wizard and message queues come to the rescue!
When the user sends the image, the server adds the image to the message queue, along with other important details needed for processing, like the image's variables. The user receives a response that says, "Hang on tight, we're working on your image!" It's like a virtual high-five to keep them excited.
Now, the Task Wizard picks up the image processing job from the queue. They follow the instructions given by the user, compressing the image and uploading it to a magical cloud storage object like an AWS S3 bucket or an Azure Blob. The Task Wizard saves the URL of the image on your database, so you can easily access it later.
Meanwhile, the user can go about their business, knowing that their image is being handled by the Task Wizard. It's like having a personal assistant taking care of everything in the background. And when the image processing is done, the user can find the compressed image safely stored in the cloud, and the URL is ready to be used wherever it's needed.
You can refer to the flow diagram below.
With message queues and the Task Wizard by your side, you create a seamless experience for your users. They get immediate feedback, knowing that their images are being processed, while your application handles the heavy lifting behind the scenes. It's like having a team of invisible helpers making sure everything runs smoothly.
Now to the fun stuff 🪩🪄
Oh, buckle up for an epic adventure with Azure Queue and email notifications! To get started with this incredible example, we'll need a few things. Here's the magical checklist:
An Azure subscription
An Active Azure Storage Service
A Node.js Application
Email Sending Logic
We'll need to have the logic in place to send the email notifications. Imagine a clever messenger who knows how to deliver messages to the right email addresses.
Registration Endpoint:
You'll need an endpoint in your application where users can register.
You can setup and retrieve your Azure storage connection string, queue name,and queue url using this documentation.
Install the Azure queue subscriber and Azure queue package using the commands below
npm install azure-queue-subscriber
npm install @azure/storage-queue
Initialize the queue subscriber in your worker.js file as shown in the snippet below.
//Queue listener for azure queue

const subscriber = require('azure-queue-subscriber');


//Connect the worker to your database if required
 initialise_db = async () => {
  // your database connection syntax
}

(async () => {
  await Promise.all([
    initialise_db(),
  ])

console.log("Database connected for worker ");

})();

console.log(" Queue Subscriber started");

const app = subscriber.create({
    queueUrl: "<your queue url>",
    queueName: "<your queue name>",
    connectionString: "<your azure storage connection string>",
    batchSize: "<Preferred batch size>",
    async handleMessage(message, done) {
      try {
       //Your business logic here
      } catch (err) {
        console.log(err);
        done()
      }
      done();
    },

  maximumRetries: "Your preferred maximum number of retries"
});

app.on('error', (err) => {
  console.log(err.message);
});

app.start();
You can set your server to add messages to an azure queue using the snippet below.
In your package.json, ensure the worker.js file is running by adding the sample script below.
  "scripts": {
    "start": "node app.js && node worker.js",
  },
Ah, the magic begins when you kickstart your application with the command "npm run start"! . Alongside your application, the worker script also comes to life.
This worker script is like a minion, keeping an eye on your Azure queue for any messages that await processing. It's always on the lookout, ready to spring into action. When a message arrives in the queue, the worker script springs to life and invokes the handle message callback.
With every message it encounters, the worker script uses this callback to carry out the required actions then deletes the message when it's done. It's like having a team of dedicated minions at your command, each working diligently to bring your application to life.
So, when you start your application and the worker script is started, it finds its way to your Azure queue. It sifts through the messages, invoking the handle message callback to process each one. It's an continuos dance of retrieval and processing, all thanks to the synergy of your application and the worker script.
Messages can be added to the queue by adding the queueClient.sendMessage method to the end of your registration logic.
registration.js
const { QueueClient } = require("@azure/storage-queue");

const queueClient = new QueueClient("<your azure storage connection string>", "<your queue name>");

module.exports = {
    async Register(req,res) {
        try {
            const { email, password } = req.body;
            const user = new User({ email, password, });
            await user.save();
            try {

            await queueClient.sendMessage({
                    message: '<Your welcome message>', email: user.email })

            res.status(200).json({
            status: 'success',
            message: 'Welcome aboard, matey!'
        })
        } catch (error) {
            throw error
        }
    }
And with that, my friend, we've reached the end of our code example adventure! Congratulations on setting up your very first queue message. The magic begins when the Register user endpoint is called, and the message is sent soaring into the Azure queue. It's then gracefully picked up by the incredible worker.js script, ready to work its wonders.
Remember, the power of message queues is your secret weapon to level up your application's efficiency and create a user experience that's as smooth as silk. Your app will be faster, more responsive, and your users will be delighted and happy as they engage with your creation.
So, as you continue on your coding journey, don't forget the enchantment of message queues. They're your ticket to application success and user satisfaction. Keep up the great work, embrace the power of queues, and may your coding adventures be filled with happiness and efficiency. Happy queuing!


