

Photo by Thanhy Nguyen on Unsplash
Building a Seamless Email Service with Versa-Mail and Google Cloud Functions. 📧✨


Table of contents
- Versa-Mail📧🚀
- Shall we?🏁
- Time to Implement Our Email Logic! ✨🚀
- Hold on! I can explain! 🦝
- Now what's a cloud function without the cloud?😅
- Setting Up the Eventarc Trigger and Pub/Sub Service! 🎉💥
- Bet you're wondering how to get messages on the Pub/Sub Service.🤔
- Having a Blast with HTTP: Making the Service Do Your Bidding! 🚀😄
Versa-Mail📧🚀
Why versa-mail? I found myself constantly reiterating/reimplementing the same email-sending code. Figured bundling it as a versatile and reusable package would save me a lot of time.
What is Versa-Mail?
Versa Mail is a versatile emailing package that abstracts your email logic. It's a library that makes sending emails a breeze, whether you're using Nodemailer or Azure Communication Services (with even more libraries coming soon). It's a simple and lightweight package for sending emails using default templates or your pre-defined template provided by you.
Why is it So Darn Useful?🤔
Easy Installation: Getting started is as simple as abc. Just a quick, and we're good to go. You can refer to the documentation here
Versatility: Versa Mail lets you choose your email handler. Need to use Nodemailer? Go ahead! Prefer Azure? You got it! Versa Mail flexes its versatility muscles to meet your needs. Your email handler, your rules! 📧✨
Sending a Single Email or Bulk Emails: Versa Mail lets send emails with custom templates and attachments. For example, send a personalized "Hello, John Doe!" email to a recipient or multiple, or attach files specific to each user in a bulk email.💥
Attachments: Versa Mail seamlessly converts attachment URLs into base64 encoded strings, enabling you to send attachments alongside your emails effortlessly. Plus, when sending bulk emails, you can include user-specific attachments for such use cases! 📎🚀
What do you need?🛠️
Versa-Mail npm package 📧: This Node.js library simplifies email sending, providing functions for both single and bulk emails, customizable templates, and attachments. It's the core of this email service.
Google Cloud Functions with EventMac Triggers ☁️: We leverage Google Cloud Functions, a serverless compute service, to create lightweight, event-driven functions. EventMac triggers allow us to automate email sending based on specific events or schedules. You'll need a Google Cloud account to run this demo. No worries! Google provides free credits upon registration.
Pub/Sub Service 📢: Google Cloud Pub/Sub acts as our messaging backbone. It facilitates communication between our projects and the email service, ensuring emails are sent efficiently in response to triggers.
VSCode with Cloud Extension 🖥️: Visual Studio Code, equipped with the Google Cloud extension, is our development environment. It streamlines code writing, debugging, and deploying to Google Cloud, making the development process smooth and efficient.
Postman 📬: Postman is our HTTP tool for testing and debugging our email service's HTTP endpoints.
GCloud CLI ☁️: Google Cloud's command-line interface, GCloud CLI, is our go-to for managing Google Cloud resources. It'll help us set up authentication, configure our project, and interact with Google Cloud services, making our workflow seamless and efficient.
Shall we?🏁
To get our demo running, we'll need to set up the Google Cloud extension in VSCode. Note that this step is optional, you can also set up the cloud function within the Google Cloud console itself.
Navigate to the extension marketplace in vs code and search for "Google Cloud".

Download the extension and sign in via the signing prompt.
Navigate to the Google Cloud extension icon and select the + icon to add a new function.
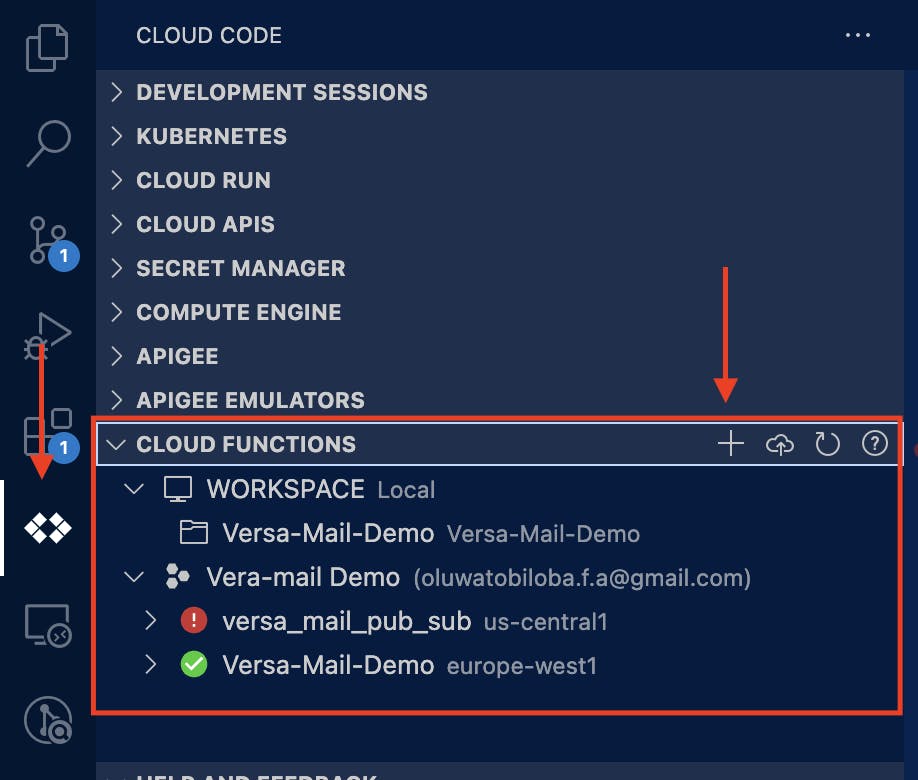
Select your preferred framework, in this case, I'll be picking Nodejs

The extension will download the "Hello World" template and save it in your selected folder.

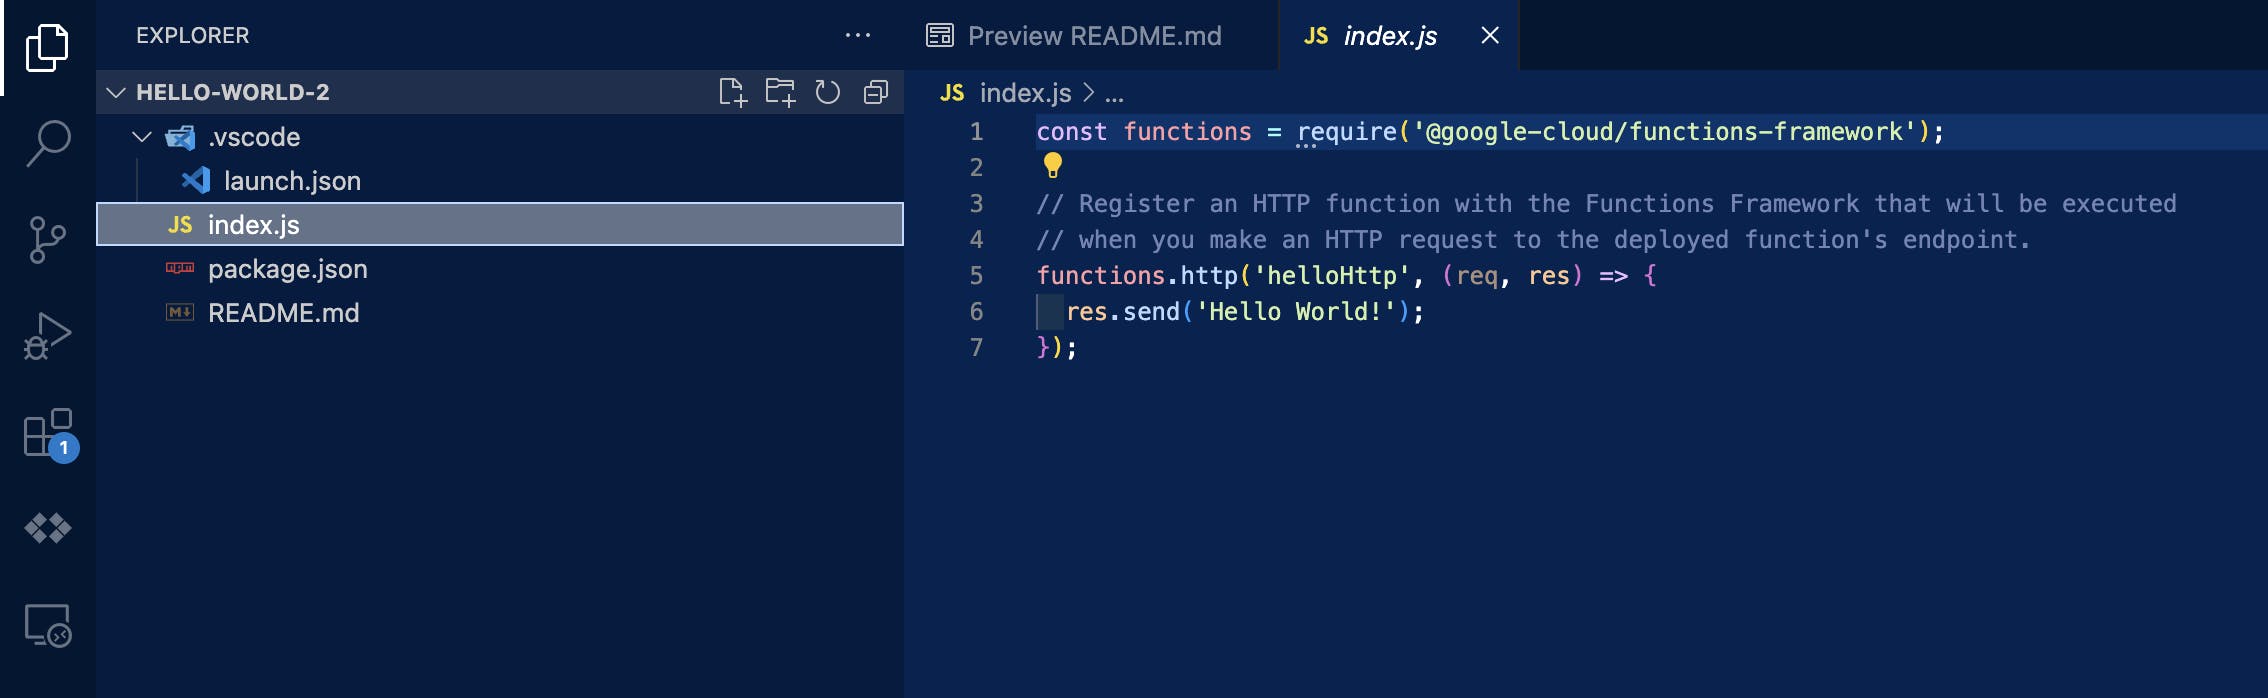
Sample Folder Structure and Components :
.vscode Subfolder 📁: This subfolder contains the
launch.jsonfile, which is tailored for configuring and launching debugging sessions specifically for Google Cloud Functions. It ensures smooth debugging for our function.index.js 📄: This file serves as the main entry point for our function application. It includes an import statement for the framework of the functions and uses the
functions.httpmethod to register an HTTP function named 'helloHttp'. This function takes two essential parameters:req(request): Represents the incoming HTTP request.res(response): The canvas on which you'll paint your response to send back to the client.
package.json 📦: The package.json file serves as the blueprint for our project's ecosystem, listing all the packages and dependencies required for harmonious functioning. To enable local testing using
npm run startEnsure that you have installed'@google-cloud/functions-framework'globally using the commandnpm install -g @google-cloud/functions-framework."scripts": { "start": "npx @google-cloud/functions-framework --target=<your_function_name>" }readme. md 📝: Google's guide to using the HelloWorld template! This file contains straightforward instructions on how to make the most of the "hello world" template.
Time to Implement Our Email Logic! ✨🚀
First, let's install the packages we need.
versa-maildotenv
npm install versa-mail dotenv
Next, create a service folder that contains an index.js file with the code below.
require("dotenv").config();
const versaMail = require("versa-mail");
const nodemailerConfig = {
  emailService: process.env.emailService,
  emailUsername: process.env.emailUsername,
  emailPassword: process.env.emailPassword,
  senderAddress: process.env.senderAddress,
};
const mailerType = "nodemailer";
const mailerFactory = new versaMail();
const mailer = mailerFactory.createMailer(mailerType, nodemailerConfig);

module.exports = {
  single: async (data) => {
    try {
      const options = data;
      const response = await mailer.sendEmail(options);
      return response;
    } catch (error) {
      throw error;
    }
  },
  bulk: async (data) => {
    try {
      const options = data;
      const response = await mailer.sendBulk(options);
      return response;
    } catch (error) {
      throw error;
    }
  },
};
In this service file above, we're setting up our logic to send emails using the versa-mail library and configuring it with our email service details securely stored in a .env file. For this demo, I'll be using the Nodemailer service. Here's a breakdown of the code:
require("dotenv").config();: This line loads thedotenvpackage that helps us manage environment variables, which we will use to store sensitive information like our email credentials.const versaMail = require("versa-mail");: We import theversa-mailpackage, our champ of the day.const nodemailerConfig = { ... }: We create a configuration objectnodemailerConfigthat contains information needed to send emails, such as our email service provider, username, password, and sender address. These values are fetched securely from a.envfile.const mailerType = "nodemailer";: We specify that we want to use Nodemailer as our email sender.const mailerFactory = new versaMail();: We create an instance of theversaMailpackage to set up our email sender.const mailer = mailerFactory.createMailer(mailerType, nodemailerConfig);: We configure our email sender using themailerFactoryand the options fromnodemailerConfig.Finally, we export two functions:
single: This function is for sending a single email. It takes email options as input, and it uses the configuredmailerto send the email.bulk: This function is for sending multiple emails at once. It also takes email options as input and uses the configuredmailerto send them.
Next up, our .env file
emailService="gmail"

emailUsername="<Email username>"

emailPassword="<Email password>"

senderAddress="<Sender Address>"
This is to securely store our environment variables, don't forget to add this file to your git ignore to avoid committing secrets.
Now to our function app, replace the existing content of the index.js file with this.
// First, we import out pacakages and modules💥
const { http } = require("@google-cloud/functions-framework"); // Our HTTP handling function
const service = require("./services"); // Our service module
// 📨 Defining the Email Types
// Our acceptable email types 💌
const acceptedTypes = ["single", "bulk"];
// ⚙️ Processing the Request
// A function to process requests recieved
const processRequest = async (req, res, body) => {
// Retrieve the email type required
const type = body.type;
// Validate the email type 🕵️♂️
if (!type || !acceptedTypes.includes(type)) {
throw new Error("Invalid or missing email type - must be 'single' or 'bulk'.");
}
// Call the service 🚀
const response = await service[type](body);
res.status(200).json(response).send();
};
// 🚀 Request Handler
const handler = async (req, res) => {
// Is this a user-triggered HTTP call? Or an Eventarc trigger? 🤖
if (!req.body.message?.data || !req.body.message?.messageId || !req.body.message?.publishTime) {
// If its a user-triggered request, retrive the body 🙋♂️
const body = req.body;
// Process the email request with all the deets! 🤓
await processRequest(req, res, body);
} else {
// It's an Eventarc trigger! Decode and parsing the message body! 🧙♂️✨
const messageData = JSON.parse(Buffer.from(req.body.message.data, "base64").toString("utf-8"));
// Process the email request 📧🚀
await processRequest(req, res, messageData);
}
};
// Bring it all together! 🎭
http("versaMailService", async (req, res) => {
try {
await handler(req, res);
} catch (error) {
console.error(error);
// Oops! Something went wrong. Let's handle it gracefully. 🤯
res.status(400).json({ error: error.message }).send();
}
});
Hold on! I can explain! 🦝
Importing Our tools
We start by importing two important tools:
http: This helps us manage HTTP requests for the functions.service: It's our service module that handles all the email services behind the scenes. 💌
Defining the Email Types
- We know the types of emails we can handle, so we create a list of accepted types: "single" or "bulk". These are the types of email requests we can process.
Processing the Request
Now, let's dive into processing email requests. We create a function
processRequestthat takes three things:req: The incoming request (like a letter to us).res: The response we'll send back (our reply).body: This is the content of the request, it contains the options required by the service file to process the email.
Identifying the Email Type
We look at the
typeproperty within thebodyto figure out what kind of email it is.We also check if the type is valid (either "single" or "bulk"). If it's not, we say, "Hey, that's an invalid email type!" 🙅♂️. Basically to avoid any unexpected behaviors.
Getting to work
If everything checks out, we use our
serviceto handle the email based on the type.When all is done, and the email is sent successfully, we respond with a success message (status 200) along with the email service's response.
The Main Event
- We check if the request is triggered by a user via HTTP or an Eventarc trigger.
An Eventarc trigger is like a digital alarm clock for your software. It waits for specific events to happen and then wakes up your program to respond. In this case,our eventarc is connected to a Pub/Sub service.
Here's how it works:
Pub/Sub Service: Think of it as a message board. You have different "topics" on this board. These topics are like categories where you can post messages. We use two topics for this demo,
bulk_emailsandsingle_emails.Both topics will be created belowSending Messages to the Topic: We post messages on these topics whenever we want to trigger an email to be sent. This allows us to send emails asynchronously, like a 'fire and forget' method, freeing up our system to perform other tasks without waiting for the email to be sent.
Eventarc Trigger: Eventarc is like the person who watches this message board. It's always on the lookout for specific messages on certain topics. When it sees the right message on the right topic, it triggers an action, in this case it makes a http request to our function application.
So, in summary, Eventarc is the "watchdog" that listens to messages on the Pub/Sub message board. When it spots a
bulk_emailorsingle_emailmessage it wakes up our function and processes the email request. It's a way to make our software react to events in real-time and maintain asynchronousity! 🚀📢
Processing User Requests
- If the request is from HTTP trigger created by a user, we grab the request body and process the email request with all the details provided.
Processing Event-Triggered Requests
- If it's triggered by the message publishing event, we do some decoding and parsing to understand the request, and then we process it just like a user request.
Now what's a cloud function without the cloud?😅
Let's deploy our application, the Google Cloud vscode extension makes this really straightforward.
- Navigate to the extension and select the deploy icon

- Select an existing project or create a new one.

- Select the runtime to be used, in this case
Nodejs 20.

- Select the region to deploy to, we'll be using
europe-west1

- You should get a successful deployment in the console below.

Voila! We have just deployed the service, but hold on! We aren't done yet.
Setting Up the Eventarc Trigger and Pub/Sub Service! 🎉💥
Navigate to you Google cloud console and select your project.

Navigate to the sidebar and select Cloud Run
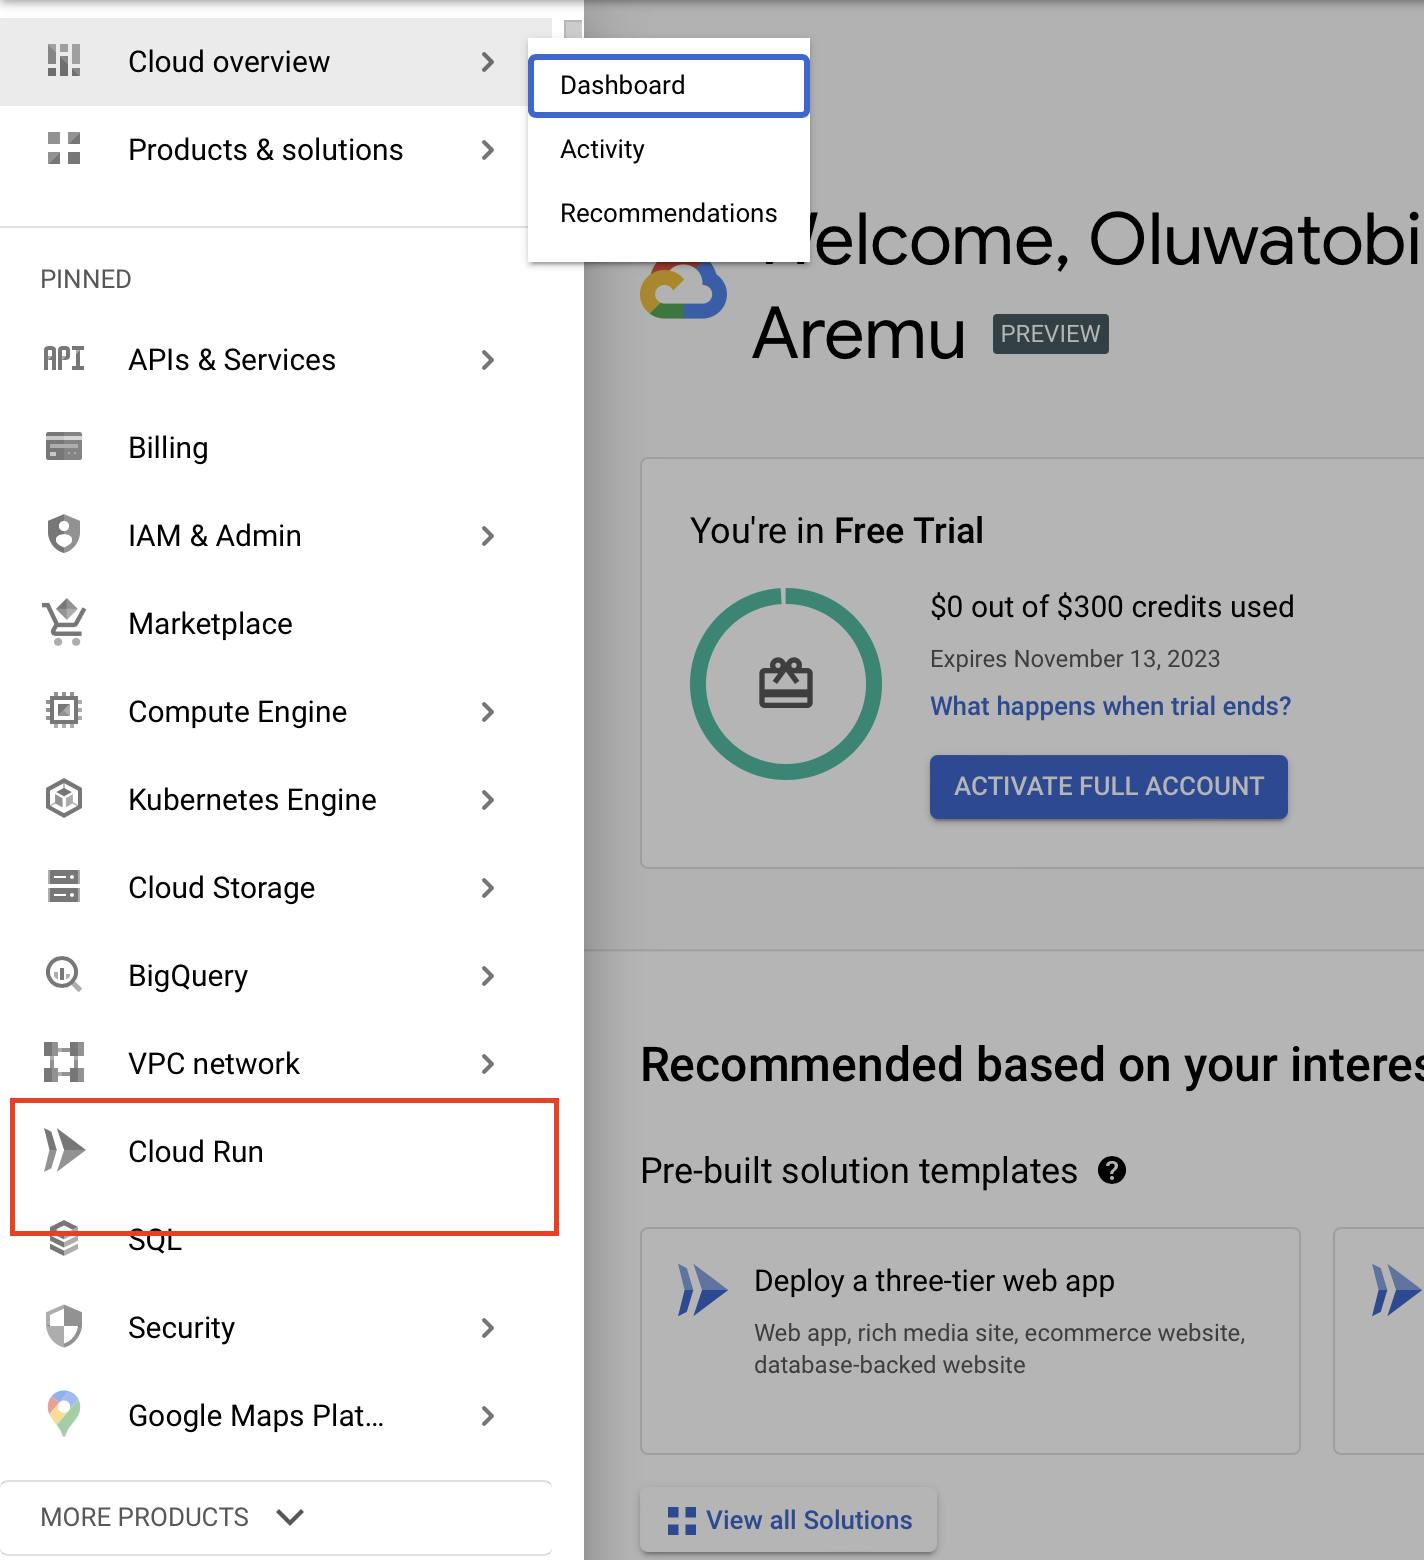
Your function will be displayed here, select it to access the function dashboard.

Navigate to the triggers tab.

Select Add Eventarc Trigger (You'll be prompted to enable the required APIs).

Fill the required fields and leave the topic field empty. A topic will be created for you.

The trigger will be created alongside the topic as shown below. you can repeat the same for the single_emails topic.

Now we have our triggers and topic set, easy innit?😏
Bet you're wondering how to get messages on the Pub/Sub Service.🤔
Here's a simple function you can embed in any project that you'll be using to utilize the service.
// Load environment variables from a .env file
require("dotenv").config();

// Import the Pub/Sub module from the Google Cloud library
const { PubSub } = require("@google-cloud/pubsub");

// Parse the TOPIC_INFO environment variable into a JavaScript object
const topicObj = JSON.parse(process.env.TOPIC_INFO);

// Get the Project ID from the environment variables
const projectId = process.env.PROJECT_ID;

// Create a new Pub/Sub client with the specified Project ID
const pubsub = new PubSub({ projectId });

// Define a function to publish a message to a Pub/Sub topic
const publishMessage = async (topicName, message) => {
  // Get the topic name or ID from the parsed topicObj
  const topicNameOrId = topicObj[topicName].name;

  // Get a reference to the specified topic
  const topic = pubsub.topic(topicNameOrId);

  // Retrieve the topic to ensure it exists
  const retrieveTopic = await topic.get();
  const retrievedTopic = retrieveTopic[0];

  // Prepare the message content and custom attributes
  const json = message;
  const customAttributes = {
    origin: "<your project name>",
    type: message.type,
  };

  // Publish the message to the retrieved topic with custom attributes
  const sendMessage = await retrievedTopic.publishMessage({
    json,
    attributes: customAttributes,
  });

  // Log the result of the message publishing
  console.log(sendMessage);
};
You can Integrate this function as a module. Embed it within your project to utilize the asynchronous nature of the email service. You can easily obtain the necessary environment variables from your Google Cloud dashboard. Below we've got some example messages for both bulk and single emails! 🛠️📨
const singleMessage = {
  type: "single",
  withDefaultTemplate: true,
    templateName: "welcome",
    constants: {
        username: "John Doe",
        subject: "Test Email",
        body: "Hello, this is a test email!",
        sender: "Versa Champ",
        platform: "Test Mailer"
    },
    email: "test@test.com",
    replyTo: "reply@example.com",
    subject: "Test Email Subject",
    message: "This is the text content of the email.",
    attachments: [
        {
            "name": "attachment.txt",
            "url": "<attachment_url>"
        }
    ]
};

const bulkMessage = {
  type: "bulk",
  withDefaultTemplate: true,
  templateName: "welcome",
  subject: "Welcome to our Community!",
  users: [
    {
      email: "test@test.com",
      username: "User One",
      body: "Hello User One, welcome to our community!",
      attachments: [
         {
            "name": "attachment.txt",
            "url": "<attachment_url>"
        },
      ],
    },
    {
      email: "test_2@test.com",
      username: "User Two",
      body: "Hello User Two, welcome to our community!",
      attachments: [
         {
            "name": "attachment.txt",
            "url": "<attachment_url>"
        },
      ],
    },
  ],
  constants: {
    platform: "Test Mailer",
    sender: "Test Sender",
  },
};
For a better understanding of the messages, refer to the versa-mail package documentation.
Having a Blast with HTTP: Making the Service Do Your Bidding! 🚀😄
Here are Curl Requests for Single and Bulk Emails;
- Single emails
curl --location '{your_function_url}/{your_function_name}?type=single' \
--header 'Authorization: bearer $(gcloud auth print-identity-token)' \
--header 'Content-Type: application/json' \
--data-raw '{
    "withDefaultTemplate": true,
    "templateName": "welcome",
    "constants": {
        "username": "John Doe",
        "subject": "Test Email",
        "body": "Hello, this is a test email!",
        "sender": "Versa Champ",
        "platform": "Test Mailer"
    },
    "email": "test@test.com",
    "replyTo": "reply@example.com",
    "subject": "Test Email Subject",
    "message": "This is the text content of the email.",
    "attachments": [
        {
            "name": "attachment.txt",
            "url": "<attachment_url>"
        }
    ]
}'
Bulk Email
  curl --location '{your_function_url}/{your_function_name}?type=bulk' \
  --header 'Authorization: bearer $(gcloud auth print-identity-token)' \
  --header 'Content-Type: application/json' \
  --data-raw '{
      "type": "bulk",
      "withDefaultTemplate": true,
      "templateName": "welcome",
      "subject": "Welcome to our Community!",
      "users": [
          {
              "email": "test@test.com",
              "username": "User One",
              "body": "Welcome to our community!",
              "attachments": [
                  {
                      "name": "image_1",
                      "url": "<attachment_url>"
                  }
              ]
          },
          {
              "email": "test_2@test.com",
              "username": "User Two",
              "body": "welcome to our community!",
              "attachments": [
                  {
                      "name": "image_2",
                      "url": "<attachment_url>"
                  }
              ]
          }
      ],
      "constants": {
          "platform": "Test Mailer",
          "sender": "Test Sender"
      }
  }'
For a better understanding of the payloads, refer to the
versa-mailpackage documentation.
Note: To make requests to your cloud function, you'll need to obtain a bearer token by running
gcloud auth print-identity-tokenin your terminal. This requires installing the'gcloud'CLI and logging in using the'gcloud auth'command. Alternatively, you can configure your function to require no authentication, but keep in mind that this leaves it vulnerable to unauthorized use. It's worth noting that when testing your function locally, authentication is not required.
Here's a link to the completed demo on github.
That was fun, wasn't it? Now we have reached the end of this serverless journey.
May your emails always reach their destination swiftly and your projects shine brightly. Happy coding! 🚀📧😊