Redis Caching as an Express Middleware
Boosting Performance and Efficiency in Your Express Applications using Redis.

Photo by Marvin Meyer on Unsplash
Table of contents
- Some type of introduction 👨🏽🏫
- What are we trying to achieve❓
- What is the Post-execution Middleware?🤔
- Characteristics worth noting:
- How We Use Post-execution Middleware🤖
- We can't build without tools. 🧰
- Let's dig in!🏗️
- Setting Up Redis Connection.💡
- Creating the Redis Middleware🔧
- Integrating Middleware in Express Application
- The middleware in action
- In Conclusion
Some type of introduction 👨🏽🏫
Caching stands as a pivotal element in the realm of backend development. In its simplest form, caching involves storing frequently accessed data temporarily, aiming for swift retrieval and a reduction in the overall workload on backend resources.
A cache's primary purpose is to increase data retrieval performance by reducing the need to access the underlying slower storage layer. - Amazon
For more context into caching with Redis, you can refer to "Introduction to Caching Using Redis".
This article will illuminate the manifold benefits associated with caching. Specifically, we'll delve into the implementation of 'smart' caching, employing Redis as an express middleware. Join me on this exploration – it's bound to be an engaging experience."
What are we trying to achieve❓
The goal is to demonstrate how to integrate Redis into an Express.js application and leverage its capabilities to implement a caching layer. Caching, in this context, refers to the temporary storage of response data so that subsequent requests for the same data can be served quickly from the cache rather than recalculating or fetching it from the database.
To achieve this, I'll break down the process into manageable steps:
Setting Up Redis Connection: We'll start by establishing a connection to the Redis server from our Express application. The connection details will be encapsulated in a utility module, promoting a modular and maintainable code structure. It's important to adopt secure practices, such as using environment variables for sensitive information like passwords to ensure the integrity of your application.
Creating the Redis Middleware: With the Redis connection in place, We'll proceed to build a middleware responsible for handling caching operations. This middleware will intercept incoming requests, check if the requested data is already present in the Redis cache, and either serve the cached data or continue with the normal request flow. Additionally, we'll implement functionalities for clearing specific cache entries and adding new data to the cache.
Integrating Middleware in Express Application: We'll integrate our Redis middleware into the Express application. This involves importing the middleware module, configuring the middleware to apply to specific routes(use-case where we do not want to cache all routes), and defining exceptions for routes that should be excluded from the caching mechanism.
Custom Response Handling: To streamline response handling and execution of post-response middleware, we'll introduce a custom response module. This module enhances the Express response object with functions for sending successful responses and handling errors. It also handles the execution of post-response middleware, providing a seamless way to extend the functionality of our routes. We will be using the post-response middleware to handle our cache invalidation and to add data to our cache after a successful get request.
Implementing Redis Middleware in a Route: Finally, we'll demonstrate the practical application of our Redis middleware in a route. Specifically, we'll take a look at the
users.jsroute, where we incorporate the caching middleware to efficiently retrieve and store user data. This showcases how our caching mechanism can be seamlessly integrated into different routes within the application.
What is the Post-execution Middleware?🤔
In the context of our Express.js application and caching middleware, the post-execution middleware refers to a mechanism designed to execute additional logic or actions after the primary execution of a request-response cycle. This type of middleware extends the capabilities of routes by allowing us to perform supplementary tasks following the generation of a response. In our implementation, the post-execution middleware is seamlessly integrated into the custom response handling process to enhance the flexibility and functionality of our sample application.
Characteristics worth noting:
Asynchronous Execution:
- The Post-execution middleware functions are executed asynchronously after the main request-handling process. This asynchronous nature ensures that additional tasks can be performed without blocking the response to the client.
Extending Response Handling:
- The primary purpose of post-execution middleware is to extend the capabilities of response handling. It enables us to define actions that should be taken after a response is sent, contributing to a modular and extensible architecture.
Customizable Actions:
- We have the freedom to define custom actions within post-execution middleware functions. These actions can include tasks such as cache clearing, logging, triggering notifications, or any other post-response activities.
Integrated with Custom Response Handling:
- Post-execution middleware is intricately connected with the custom response module introduced in our implementation. This integration allows for a seamless execution flow, where post-execution middleware functions can be appended to the
postExecMiddlewaresarray and executed in a controlled manner.
- Post-execution middleware is intricately connected with the custom response module introduced in our implementation. This integration allows for a seamless execution flow, where post-execution middleware functions can be appended to the
How We Use Post-execution Middleware🤖
In our Express.js application, the post-execution middleware plays a pivotal role in extending the functionality of our routes. Here's how we utilize it:
Response Enhancement:
- The custom response module introduces the use of
res.ok()for sending successful responses. Post-execution middleware functions are registered through thereq.postExecMiddlewaresarray, allowing us to specify actions that should be performed after a successful response is sent.
- The custom response module introduces the use of
Cache Invalidation:
- One practical application of post-execution middleware in our caching middleware is cache clearing. By adding a
clearCachefunction toreq.postExecMiddlewares, we enable the automatic clearing of cache entries associated with a specific route after a successful response. This enhances data freshness and ensures that subsequent requests fetch the latest data.
- One practical application of post-execution middleware in our caching middleware is cache clearing. By adding a
By leveraging post-execution middleware, our Express.js application becomes more adaptable, allowing us to introduce additional functionalities without cluttering the core logic of the routes. This modular and extensible approach enhances the maintainability and scalability of our caching middleware implementation.
By the end of this article, you'll have a clear understanding of how to implement this smart caching middleware using Redis and Express, enhancing the performance and responsiveness of our Express.js applications. Now, Let's get this rolling! 🏗️
We can't build without tools. 🧰
For this demo we will require a couple of essential components setup: Here's a streamlined guide:
Redis Server: We can either use a live server or run Redis locally on our machine. For this demo, we will be using a free Redis server from Redis. You can follow the steps below
Sign up for a Redis account.
Upon signing up, fill in the fields below:

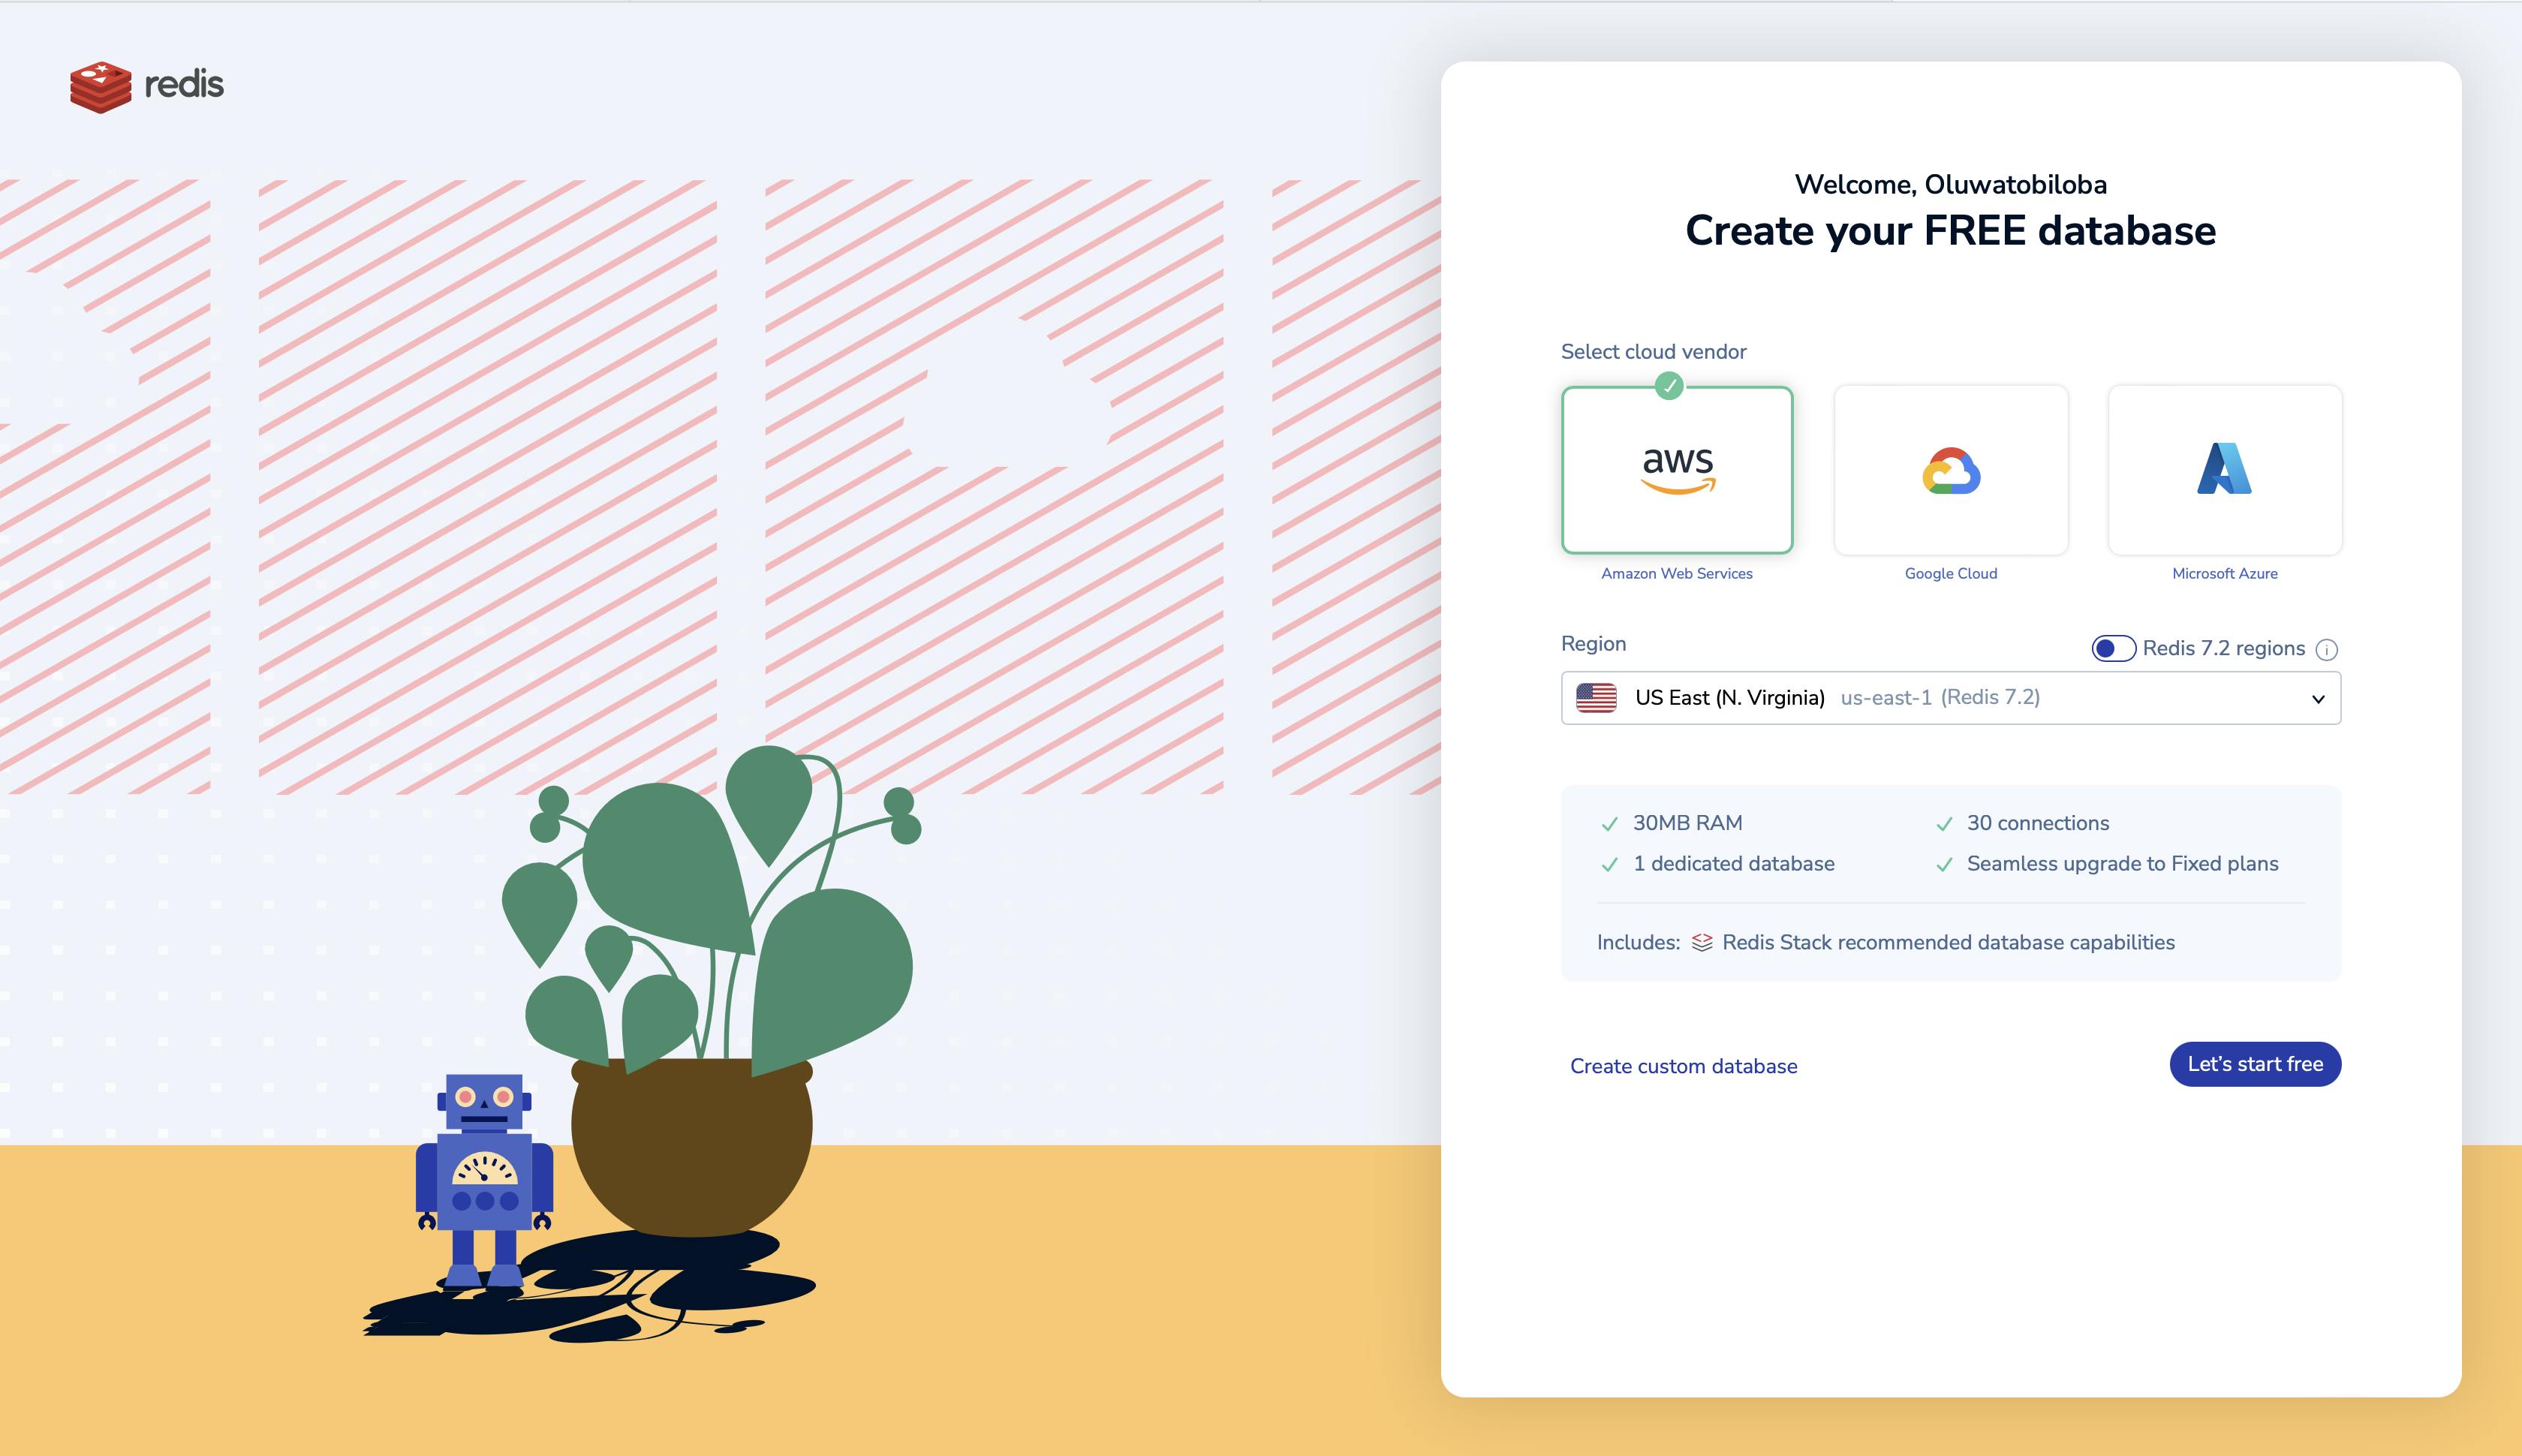
Create a database, and select your preferred host and region:
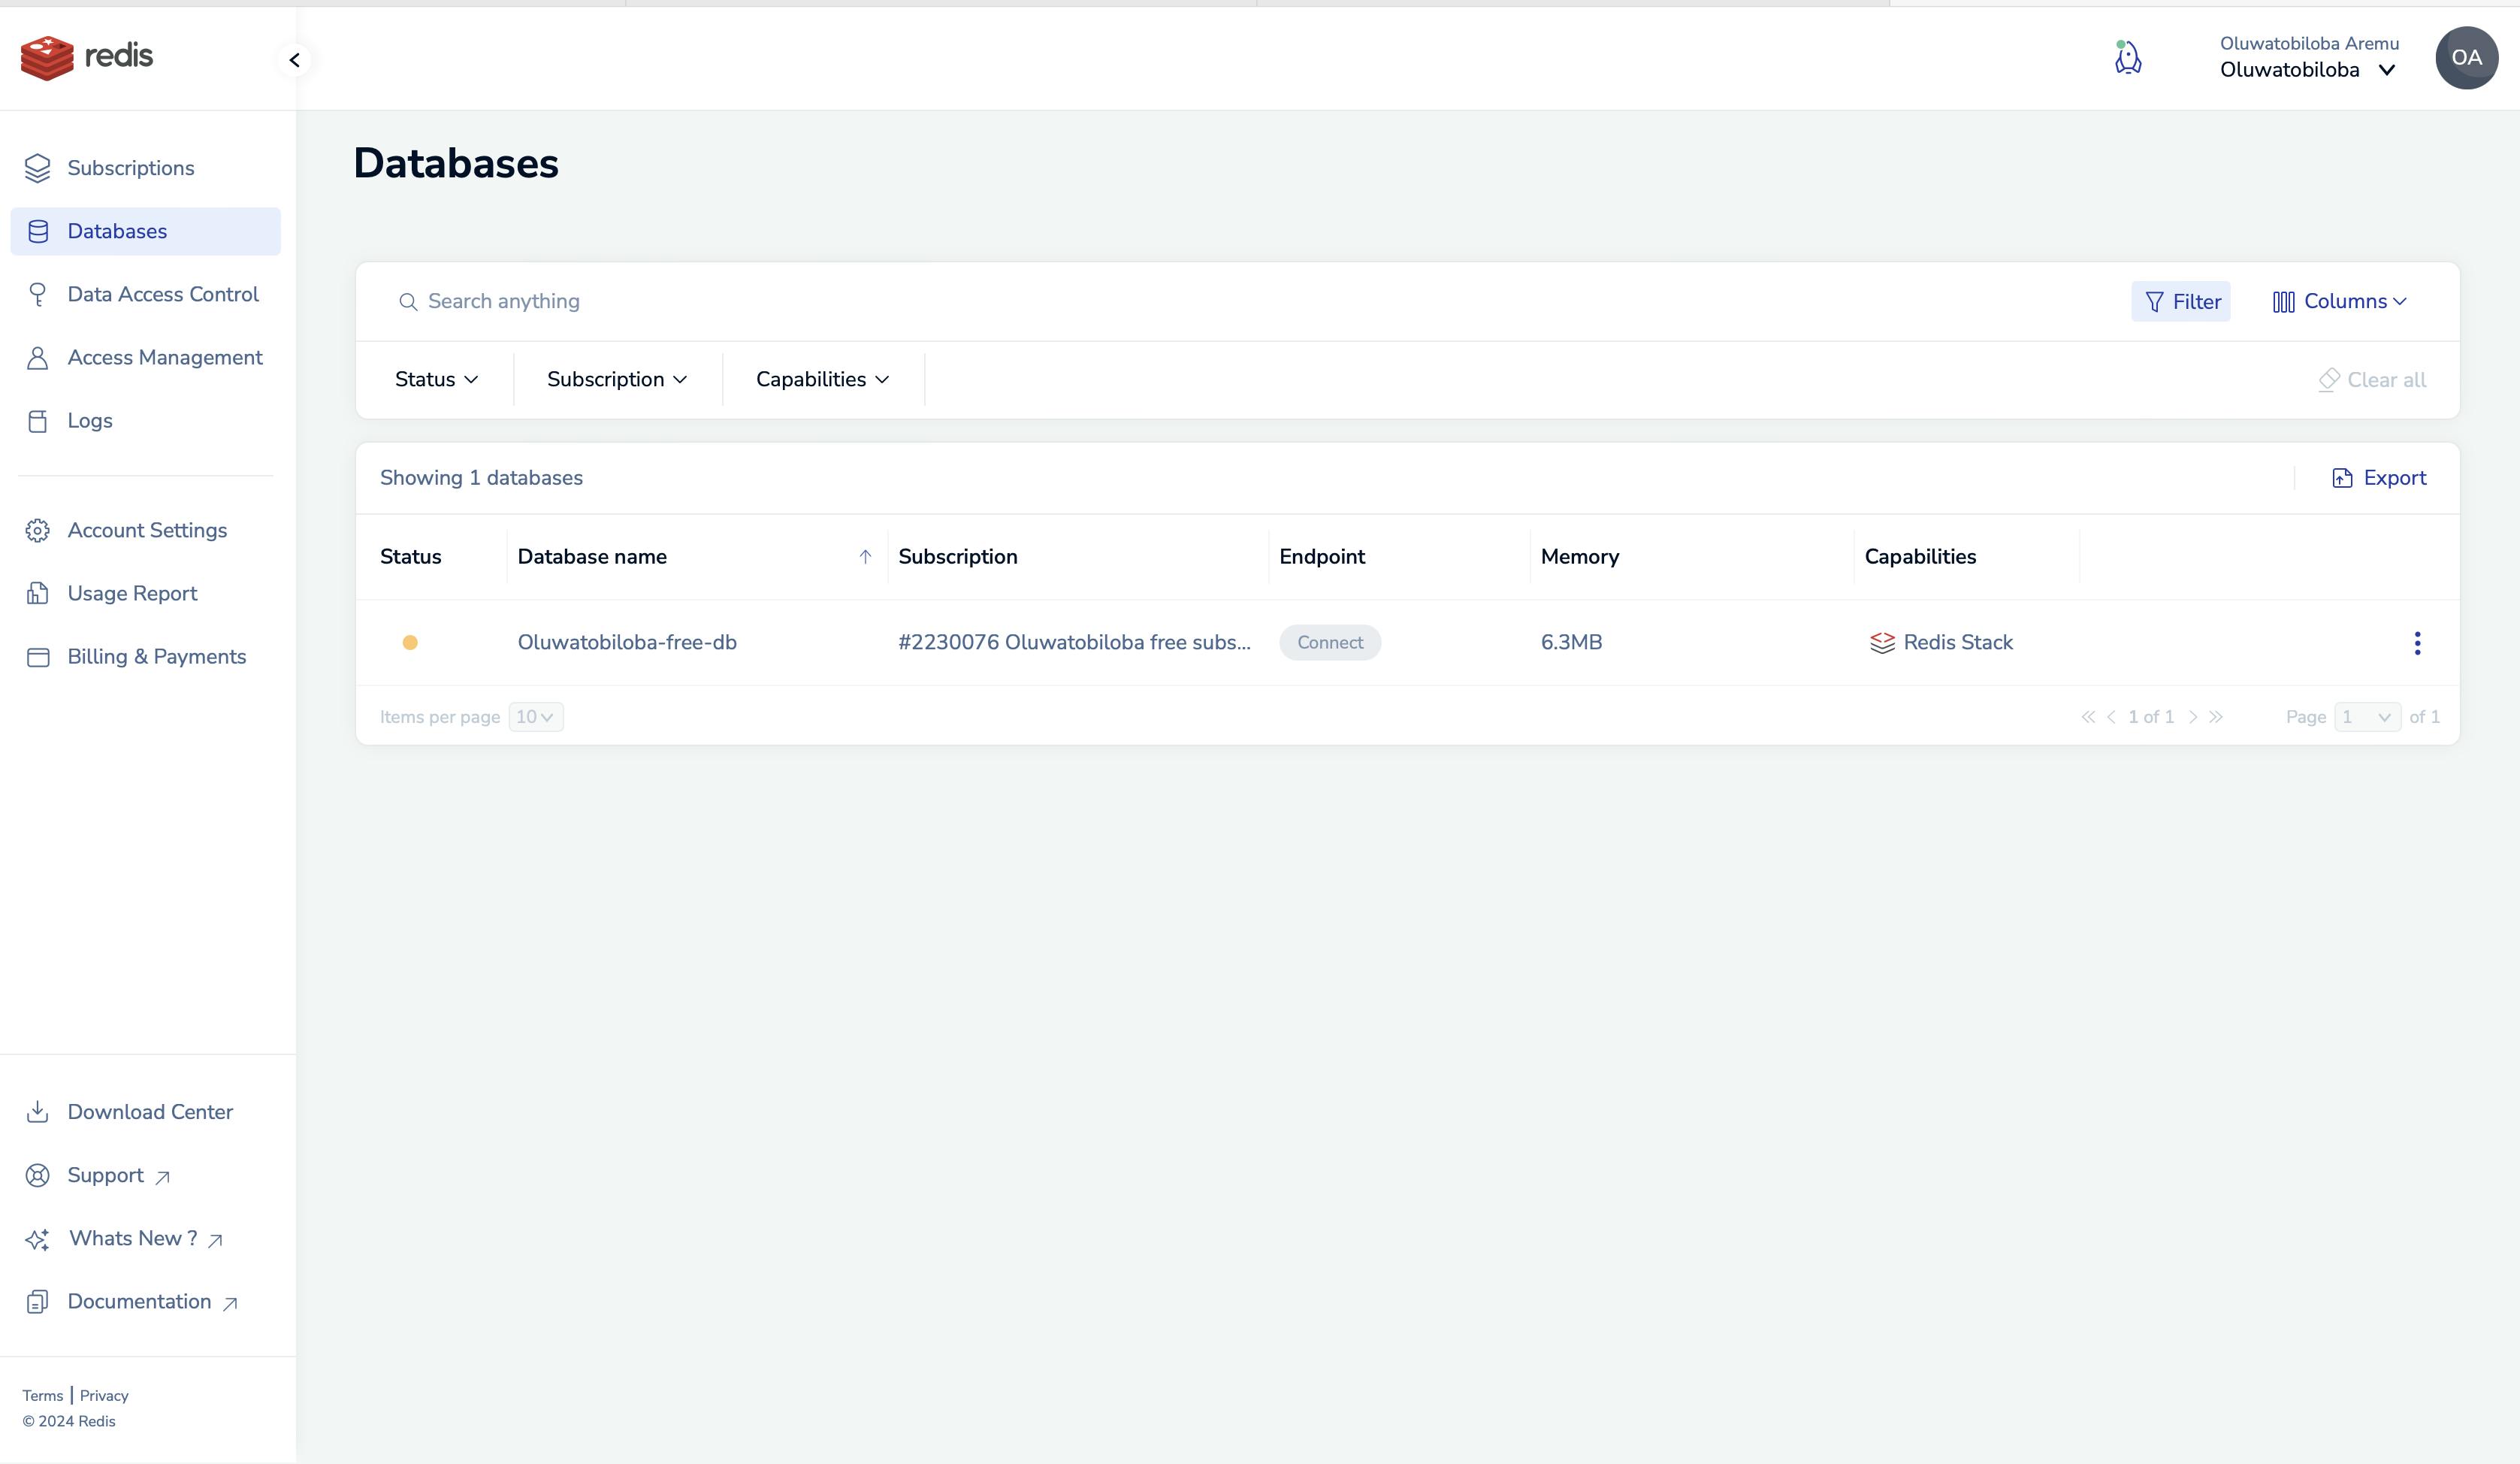
On your dashboard, wait a minute till the yellow dot(status) below turns green;
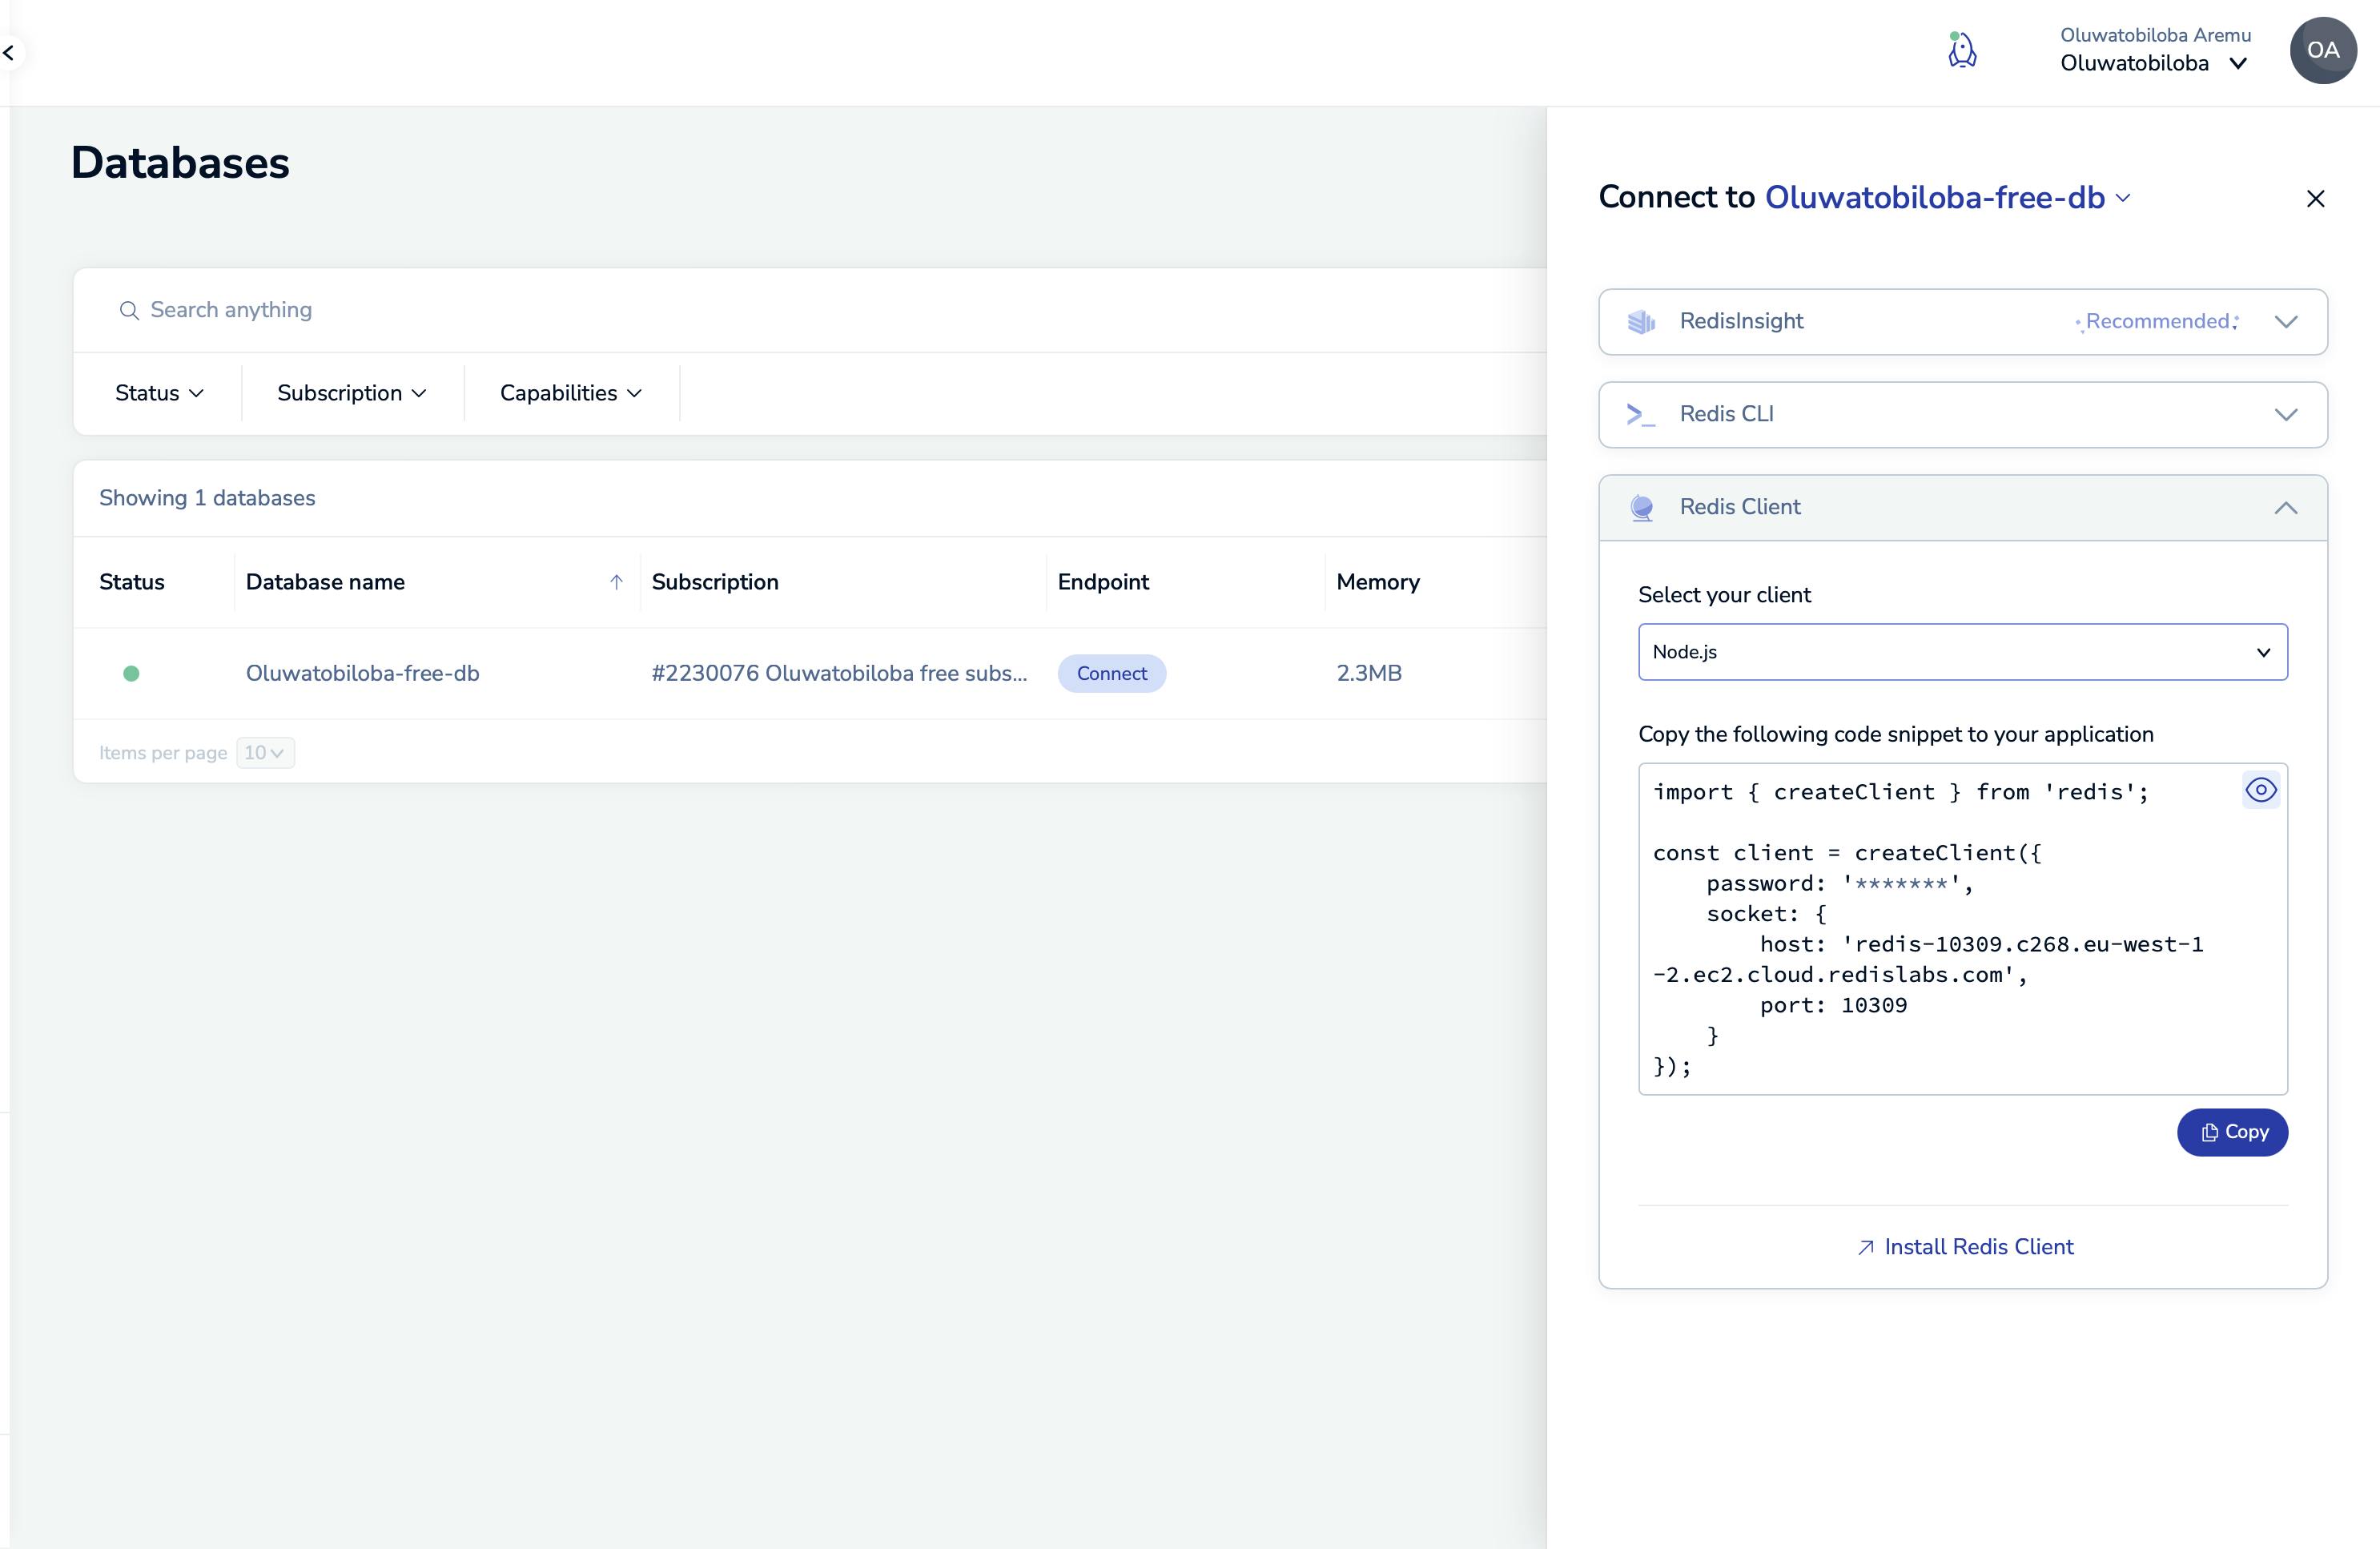
Select "Connect," then choose "Redis client," and finally, select "NodeJs" from the dropdown. Copy the generated content and save it to a temporary file.
An Express Application: Set up your express application(if you don't have any) and install Redis using the commands below.
  npx express-generator
  npm i redis
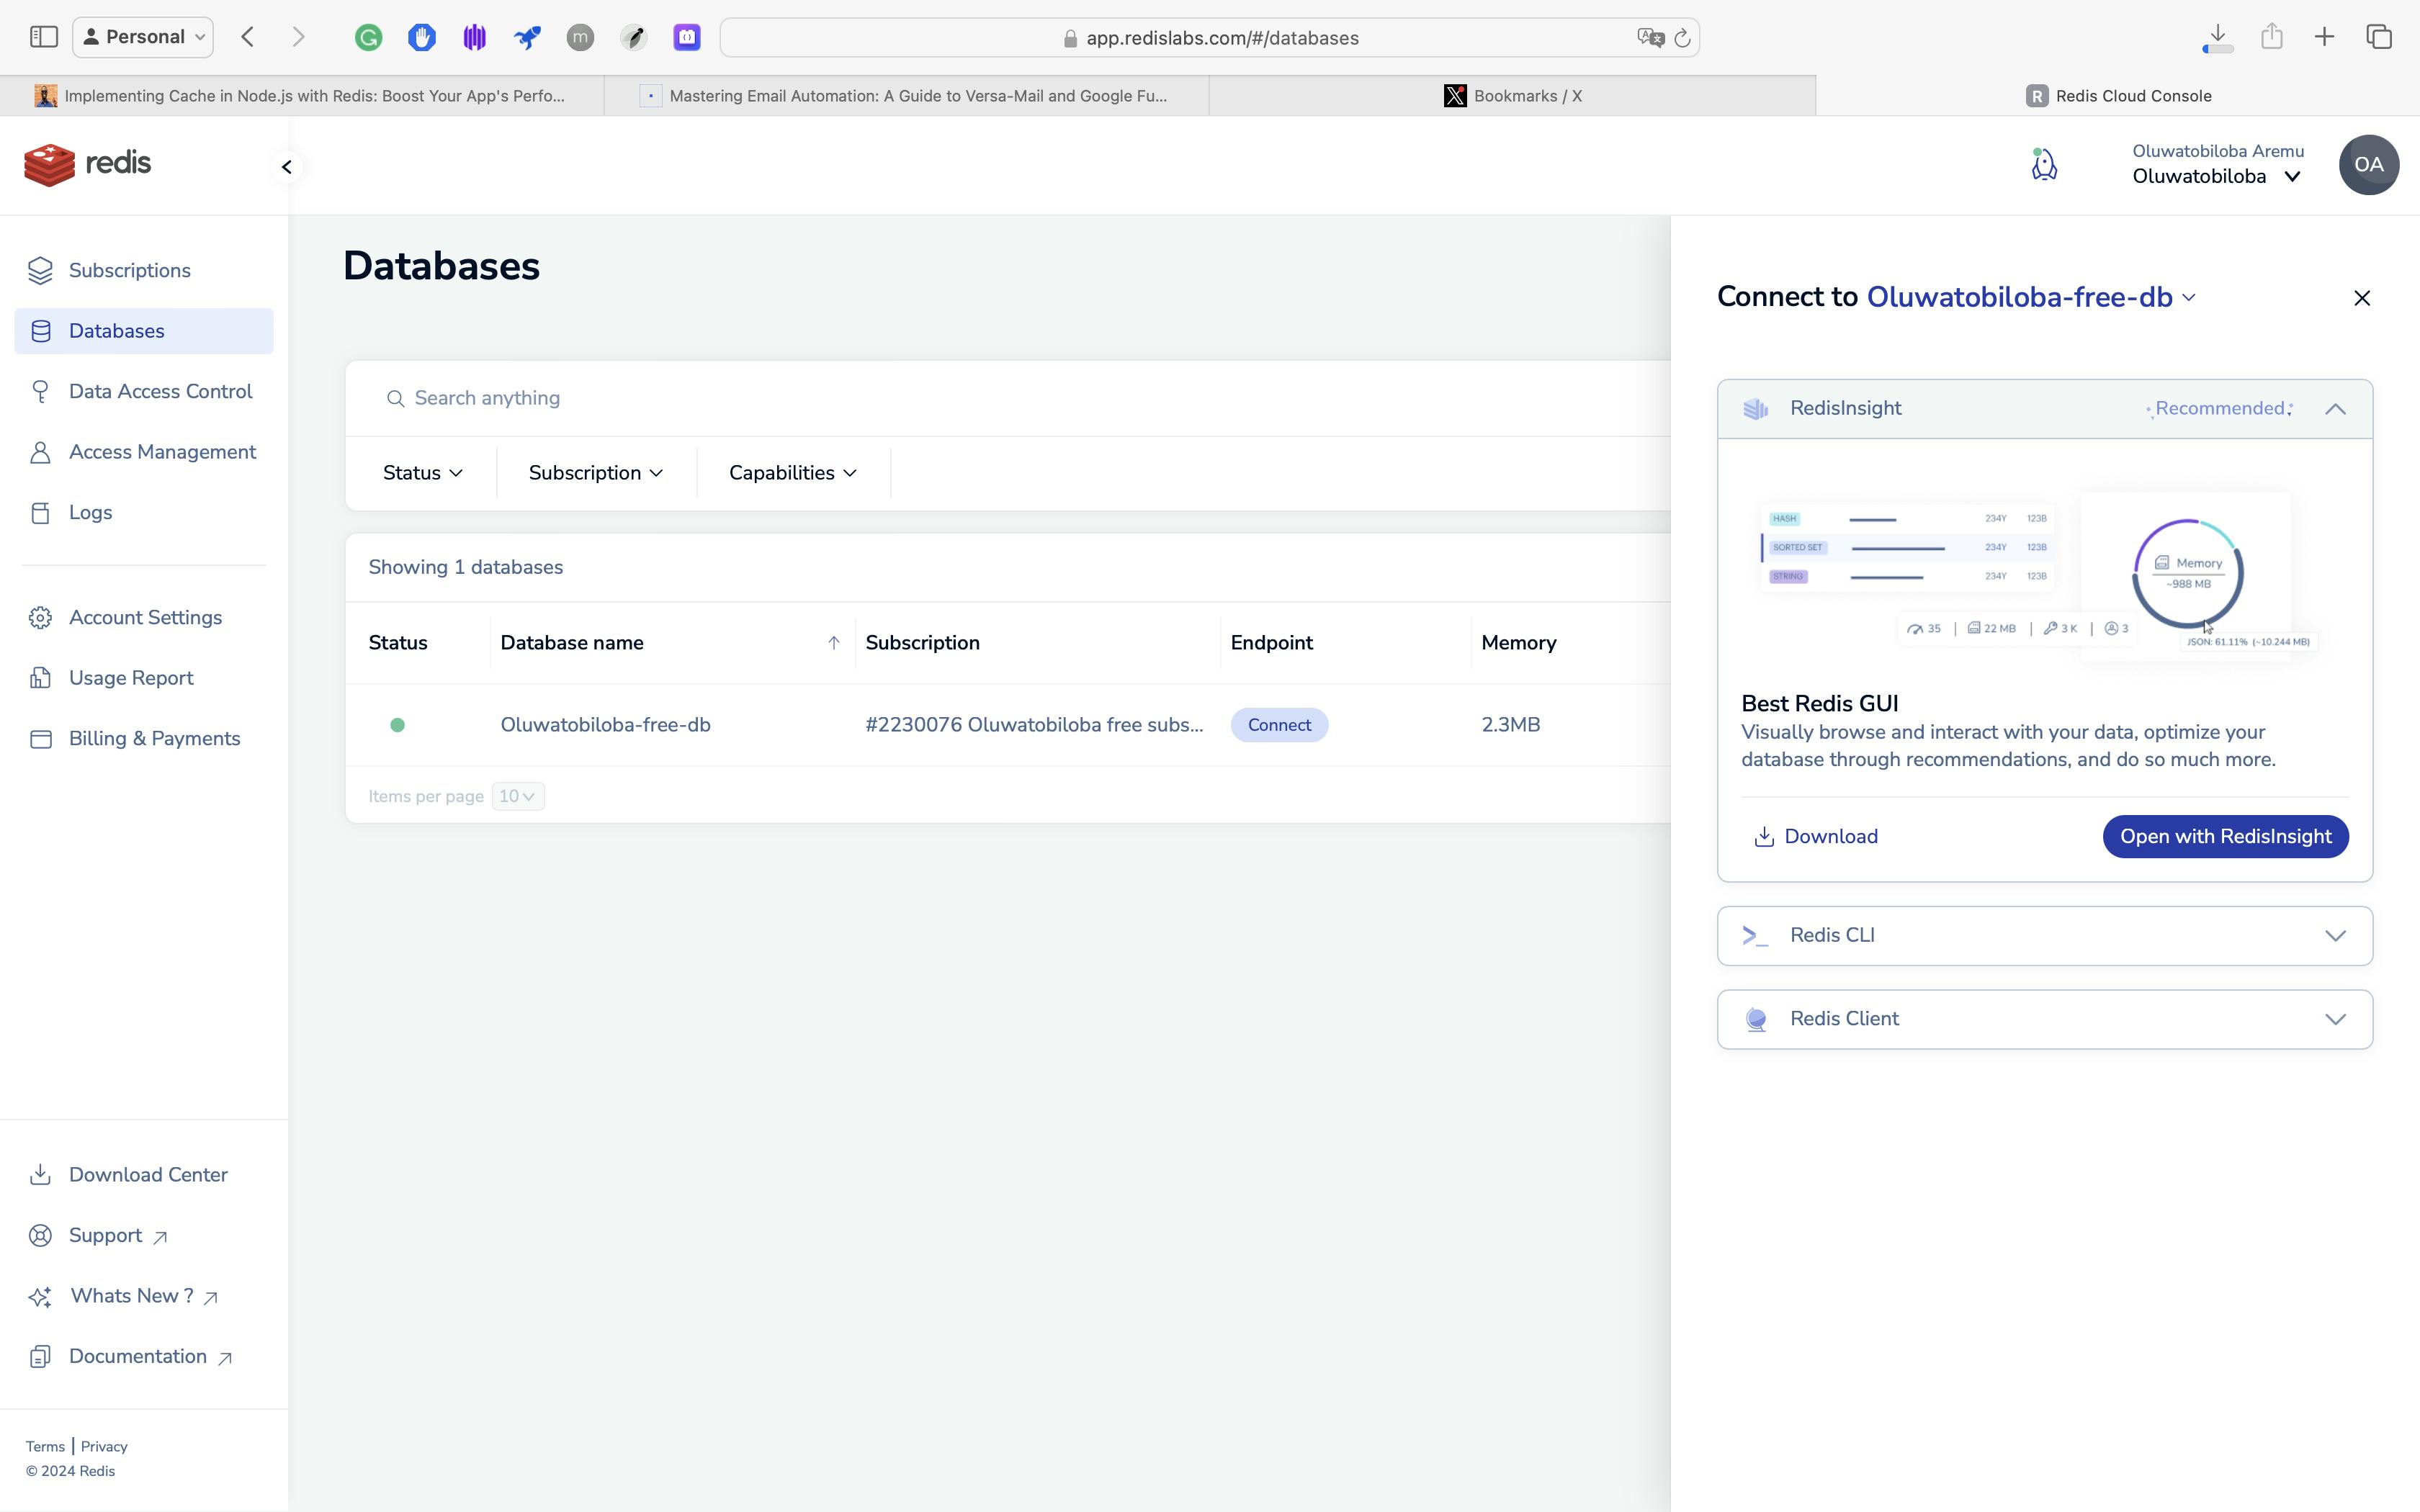
Redis Insights: We will need the RedisInsights application to navigate our Redis database. You can download from the Redis dashboard as shown below. After installation, navigate back to the dashboard and select "Open with RedisInsight" to monitor your Redis database.
We're all set to go! 🥳
Let's dig in!🏗️
We'll start with implementing our Redis connection on our express app.
Setting Up Redis Connection.💡
Create a util folder to hold our Redis helper.
Create the redis.js file with the content copied earlier while creating the Redis server, and export the client as a module.
💡Hardcoding your Redis password is bad practice and leaves you vulnerable, ensure you use an environment variable.const { createClient } = require('redis'); const client = createClient({ password: process.env.REDIS_PASSWORD, socket: { host: 'redis-10309.c268.eu-west-1-2.ec2.cloud.redislabs.com', port: 10309 } }); module.exports = client;
Importing Redis Module:
- We start by importing the
createClientfunction from the 'redis' module. This function is crucial for establishing a connection to the Redis server.
- We start by importing the
Creating a Redis Client:
- The
createClientfunction is used to create a Redis client instance (client). This instance will be responsible for interacting with the Redis server.
- The
Connection Configuration:
The configuration object passed to
createClientincludes:password: Retrieves the Redis server password from the environment variableREDIS_PASSWORD. Storing sensitive information like passwords in environment variables enhances security.socket: Specifies the host and port details of the Redis server.
Exporting the Client:
- The created Redis client instance is exported as a module. This allows other parts of our application, such as middleware and routes, to utilize the same Redis client instance for caching operations.
Creating the Redis Middleware🔧
Create a middleware folder
Create a redisCache.js file with the following content
const client = require("../utils/redis"); const utils = require("../utils/utility") module.exports = { getCache: async (req, res, next) => { try { const cacheKey = req.originalUrl; const cachedData = await client.get(cacheKey); if (cachedData) { const data = JSON.parse(cachedData); res.locals.fromCache = true; return res.ok({ status: "success", message: `Data retrieved from cache`, data: data }); } else { res.locals.fromCache = false; const addToCache = module.exports.addToCache; req.postExecMiddlewares = (req.postExecMiddlewares || []).concat(addToCache); next(); } } catch (error) { console.error('Error in getCache:', error); return res.fail(error); } }, clearCache: async (req, res, next) => { try { const baseCacheKey = utils.removePathSegments(req.originalUrl); console.log('Clearing cache with key:', baseCacheKey); const keys = await client.keys(baseCacheKey + '*'); console.log('Keys to be deleted:', keys); await Promise.all(keys.map(key => client.del(key))); } catch (error) { console.error('Error in clearCache:', error); } }, addClearCache: (req, res, next) => { const clearCache = module.exports.clearCache; req.postExecMiddlewares = (req.postExecMiddlewares || []).concat(clearCache); next(); }, addToCache: async (req, res, next) => { try { if (!res.locals.fromCache) { const cacheKey = req.originalUrl; const dataToAdd = res.locals.data; const ttlInSeconds = 3600; await client.set(cacheKey, JSON.stringify(dataToAdd), { EX: ttlInSeconds }); } } catch (error) { console.error('Error in addToCache:', error); } }, };getCacheFunction:This function retrieves cached data based on the request's original URL as the cache key.
If cached data is found, it is parsed, and the response is sent with the cached data, indicating that it was retrieved from the cache.
If no cached data is found, the middleware sets a flag (
fromCache) to false, indicating that the data is not in the cache, and includes theaddToCachefunction in the post-execution middleware to add the data to the cache after the main request processing.
clearCacheFunction:This takes the original URL of the request, removes path segments using a utility function, and constructs the base cache key.
Retrieves all keys matching the base cache key pattern and deletes them from the Redis cache.
addClearCacheFunction:- This appends the
clearCachefunction to the post-execution middleware array, ensuring that cache clearing will be performed after the main request processing.
- This appends the
addToCacheFunction:This checks if the response did not come from the cache (
!res.locals.fromCache).If not from the cache, it retrieves the cache key from the original URL, the data to be added from
res.locals.data, and a time-to-live (TTL) value. The TTL is equivalent to an expiry time after which Redis will remove the cached data.Sets the data in the Redis cache with the specified TTL.
Create a utils.js file in our util folder with this code snippet.
module.exports = { removePathSegments(url) { const regex = /^\/[^/]+/; const match = url.match(regex); return match ? match[0] : url; } }removePathSegmentsFunction:Accepts a URL as a parameter.
Uses a regular expression (
/^\/[^/]+/) to match and capture the first segment of the URL path.Returns the matched path segment if found, or the original URL if no match is found.
Create a customResponse.js file with this content:
const ErrorResponse = require('./errorResponse.js');

function extendResponseObject(req, res, next) {
    async function processPostExecMiddlewares(req, res, next) {
        for (const middleware of req.postExecMiddlewares ?? []) {
            console.log('Executing middleware:', middleware);
            await middleware(req, res, next);
        }
    }

    res.ok = async function ({ data = undefined, message = 'Successful', statusCode = 200, token = undefined  } = {}) {
        res.locals.data = data;
        const response = {
            success: true,
            message,
            data,
            token
        };
        res.status(statusCode).json(response);
        try {
            return processPostExecMiddlewares(req, res, next);
        } catch (err) {
            console.warn(err.message)
        }

    };
    const defaultErrorMessages = {
        400: 'Bad Request',
        401: 'Unauthorized',
        403: 'Forbidden',
        404: 'Not Found',
        500: 'Internal Server Error',
    };
    res.fail = function (error) {
        if (error instanceof ErrorResponse && !error.message) {
            error.message = defaultErrorMessages[error.statusCode] || 'Unknown Error';
        } else if (!(error instanceof ErrorResponse)) {
            //Implement your custom filter here
        }
        next(error);
    };

    next();
}

module.exports = extendResponseObject;
extendResponseObjectFunction:Imports the
ErrorResponseclass from the 'errorResponse.js' module.Defines a function (
processPostExecMiddlewares) responsible for asynchronously executing post-execution middlewares.Extends the Express response object (
res) with additional functionalities:res.ok: A function for sending successful responses. It sets the response data, constructs a standardized response object, sends the response, and triggers the execution of post-execution middlewares.res.fail: A function for handling errors. It checks if the error is an instance ofErrorResponseand ensures a default error message is set if none exists. Custom error filters can be implemented here.
Sets default error messages for common HTTP status codes.
Invokes the
next()function to proceed with the Express middleware chain.
Create an errorResponse.js file in your utils folder with this content.
class ErrorResponse extends Error { constructor(statusCode = 500, message = 'Internal Server Error', data = undefined, stack = undefined ) { super(message); this.statusCode = statusCode; if (stack && this.stack) { this.stack += '\n' + stack; } else { this.stack = this.stack || stack; } } } module.exports = ErrorResponse;ErrorResponseClass:Inherits from the built-in
Errorclass in JavaScript.The Constructor accepts parameters:
statusCode: HTTP status code for the error (default is 500 - Internal Server Error).message: Error message (default is 'Internal Server Error').data: Additional data associated with the error (default isundefined).stack: Stack trace information (default isundefined).
Calls the
superconstructor with the provided error message.Sets the
statusCodeproperty to the provided or default value.Handles stack trace information: If both
stackandthis.stackare present, it appends the new stack to the existing one; otherwise, it uses the providedstackor the existingstack.Exports the
ErrorResponseclass to make it available for use in other parts of the application.
In your app.js file, import the
customResponse&redisCacheand implement as shown below.const createError = require('http-errors'); const express = require('express'); const path = require('path'); const cookieParser = require('cookie-parser'); const logger = require('morgan'); const response = require('./utils/customResponse'); const indexRouter = require('./routes/index'); const usersRouter = require('./routes/users'); const redis = require('./utils/redis.js'); const utility = require('./utils/utility') const redisCache = require('./middleware/redisCache.js'); const app = express(); // View engine setup app.set('views', path.join(__dirname, 'views')); app.set('view engine', 'jade'); // Logger and body parser middleware app.use(logger('dev')); app.use(express.json()); app.use(express.urlencoded({ extended: false })); app.use(cookieParser()); app.use(express.static(path.join(__dirname, 'public'))); // Custom response middleware app.use(response); // Redis connection const connectToRedis = async () => { try { await redis.connect(); console.log('Connected to the Redis server'); } catch (error) { console.error('Error connecting to Redis:', error); } }; // Call the function to connect to Redis connectToRedis(); // Routes const excludeClearCacheRoutes = []; //Routes to be excluded from the cache clearing if any const clearCacheMiddleware = (req, res, next) => { if (req.method === 'POST' && !excludeClearCacheRoutes.includes(utility.removePathSegments(req.path))) { redisCache.addClearCache(req, res, next); } else { next(); } }; app.use(clearCacheMiddleware); app.use('/', indexRouter); app.use('/users', usersRouter); // 404 error handler app.use((req, res, next) => { next(createError(404)); }); // General error handler app.use((err, req, res, next) => { res.locals.message = err.message; res.locals.error = req.app.get('env') === 'development' ? err : {}; // Render the error page res.status(err.status || 500); res.render('error'); }); module.exports = app;Custom Response Middleware:
- We Integrate the custom response middleware (
response) to enhance the Express response object with standardized success and error handling.
- We Integrate the custom response middleware (
Redis Connection:
We define an asynchronous function (
connectToRedis) to connect to the Redis server using the importedredismodule.This calls the function to connect to Redis when the application starts.
Routes Setup:
We define an array (
excludeClearCacheRoutes) to specify routes to be excluded from cache clearing.We Implement a middleware (
clearCacheMiddleware) to conditionally add cache clearing based on the request method and route exclusion.We then apply the cache-clearing middleware and routes for the index and users.
Integrating Middleware in Express Application
Now we will navigate to the users.js file in our routes folder and implement as follows.
var express = require('express');
var router = express.Router();
const redisCache = require('../middleware/redisCache');
const usersArray = [] //This is to mimic our user database

/* GET users listing. */
router.get('/', redisCache.getCache, function(req, res, next) {
        try {
            const users = usersArray
            res.ok({
                status: "success",
                message: `User(s) retrieved`,
                data: users
            })
        } catch (error) {
           res.fail({
                status: "fail",
                message: error.message
            })
        }
});
/* POST user */
router.post('/create', function(req, res, next) {
        try {
            const addUsers = usersArray.push(req.body.user) // mimics adding users to the database
            res.ok({
                status: "success",
                message: `User Added`,
                data: usersArray,
                statusCode: 201
            })
        } catch (error) {
           res.fail({
                status: "fail",
                message: error.message
            })
        }
});

module.exports = router;
Data Initialization:
- We define an array (
usersArray) to mock our database store of users.
- We define an array (
GET Endpoint:
This handles GET requests to the root of the '/users' route.
It utilizes the
redisCache.getCachemiddleware to attempt to retrieve data from the cache.If there is redisCache has no data stored, we then try to get the data from our database.
If an error occurs,it sends a failure response with an appropriate error message.
POST Endpoint:
This handles POST requests to the '/users/create' route.
It attempts to add a new user to our datastore based on the data provided in the request body.
It sends a successful response with the updated user data and a 201 status code if the addition is successful.
If an error occurs,it sends a failure response with an appropriate error message.
You can now start your app with npm run start or any command you might've configured.
The middleware in action
In this demonstration, we'll illustrate the middleware in action. Currently, our Redis database is empty, awaiting the first GET request to the /users route. Let's walk through the process:
Add a User Using Postman:
- We utilize Postman or a similar tool to send a POST request to the
/users/createroute, adding a user to our record of users.
- We utilize Postman or a similar tool to send a POST request to the
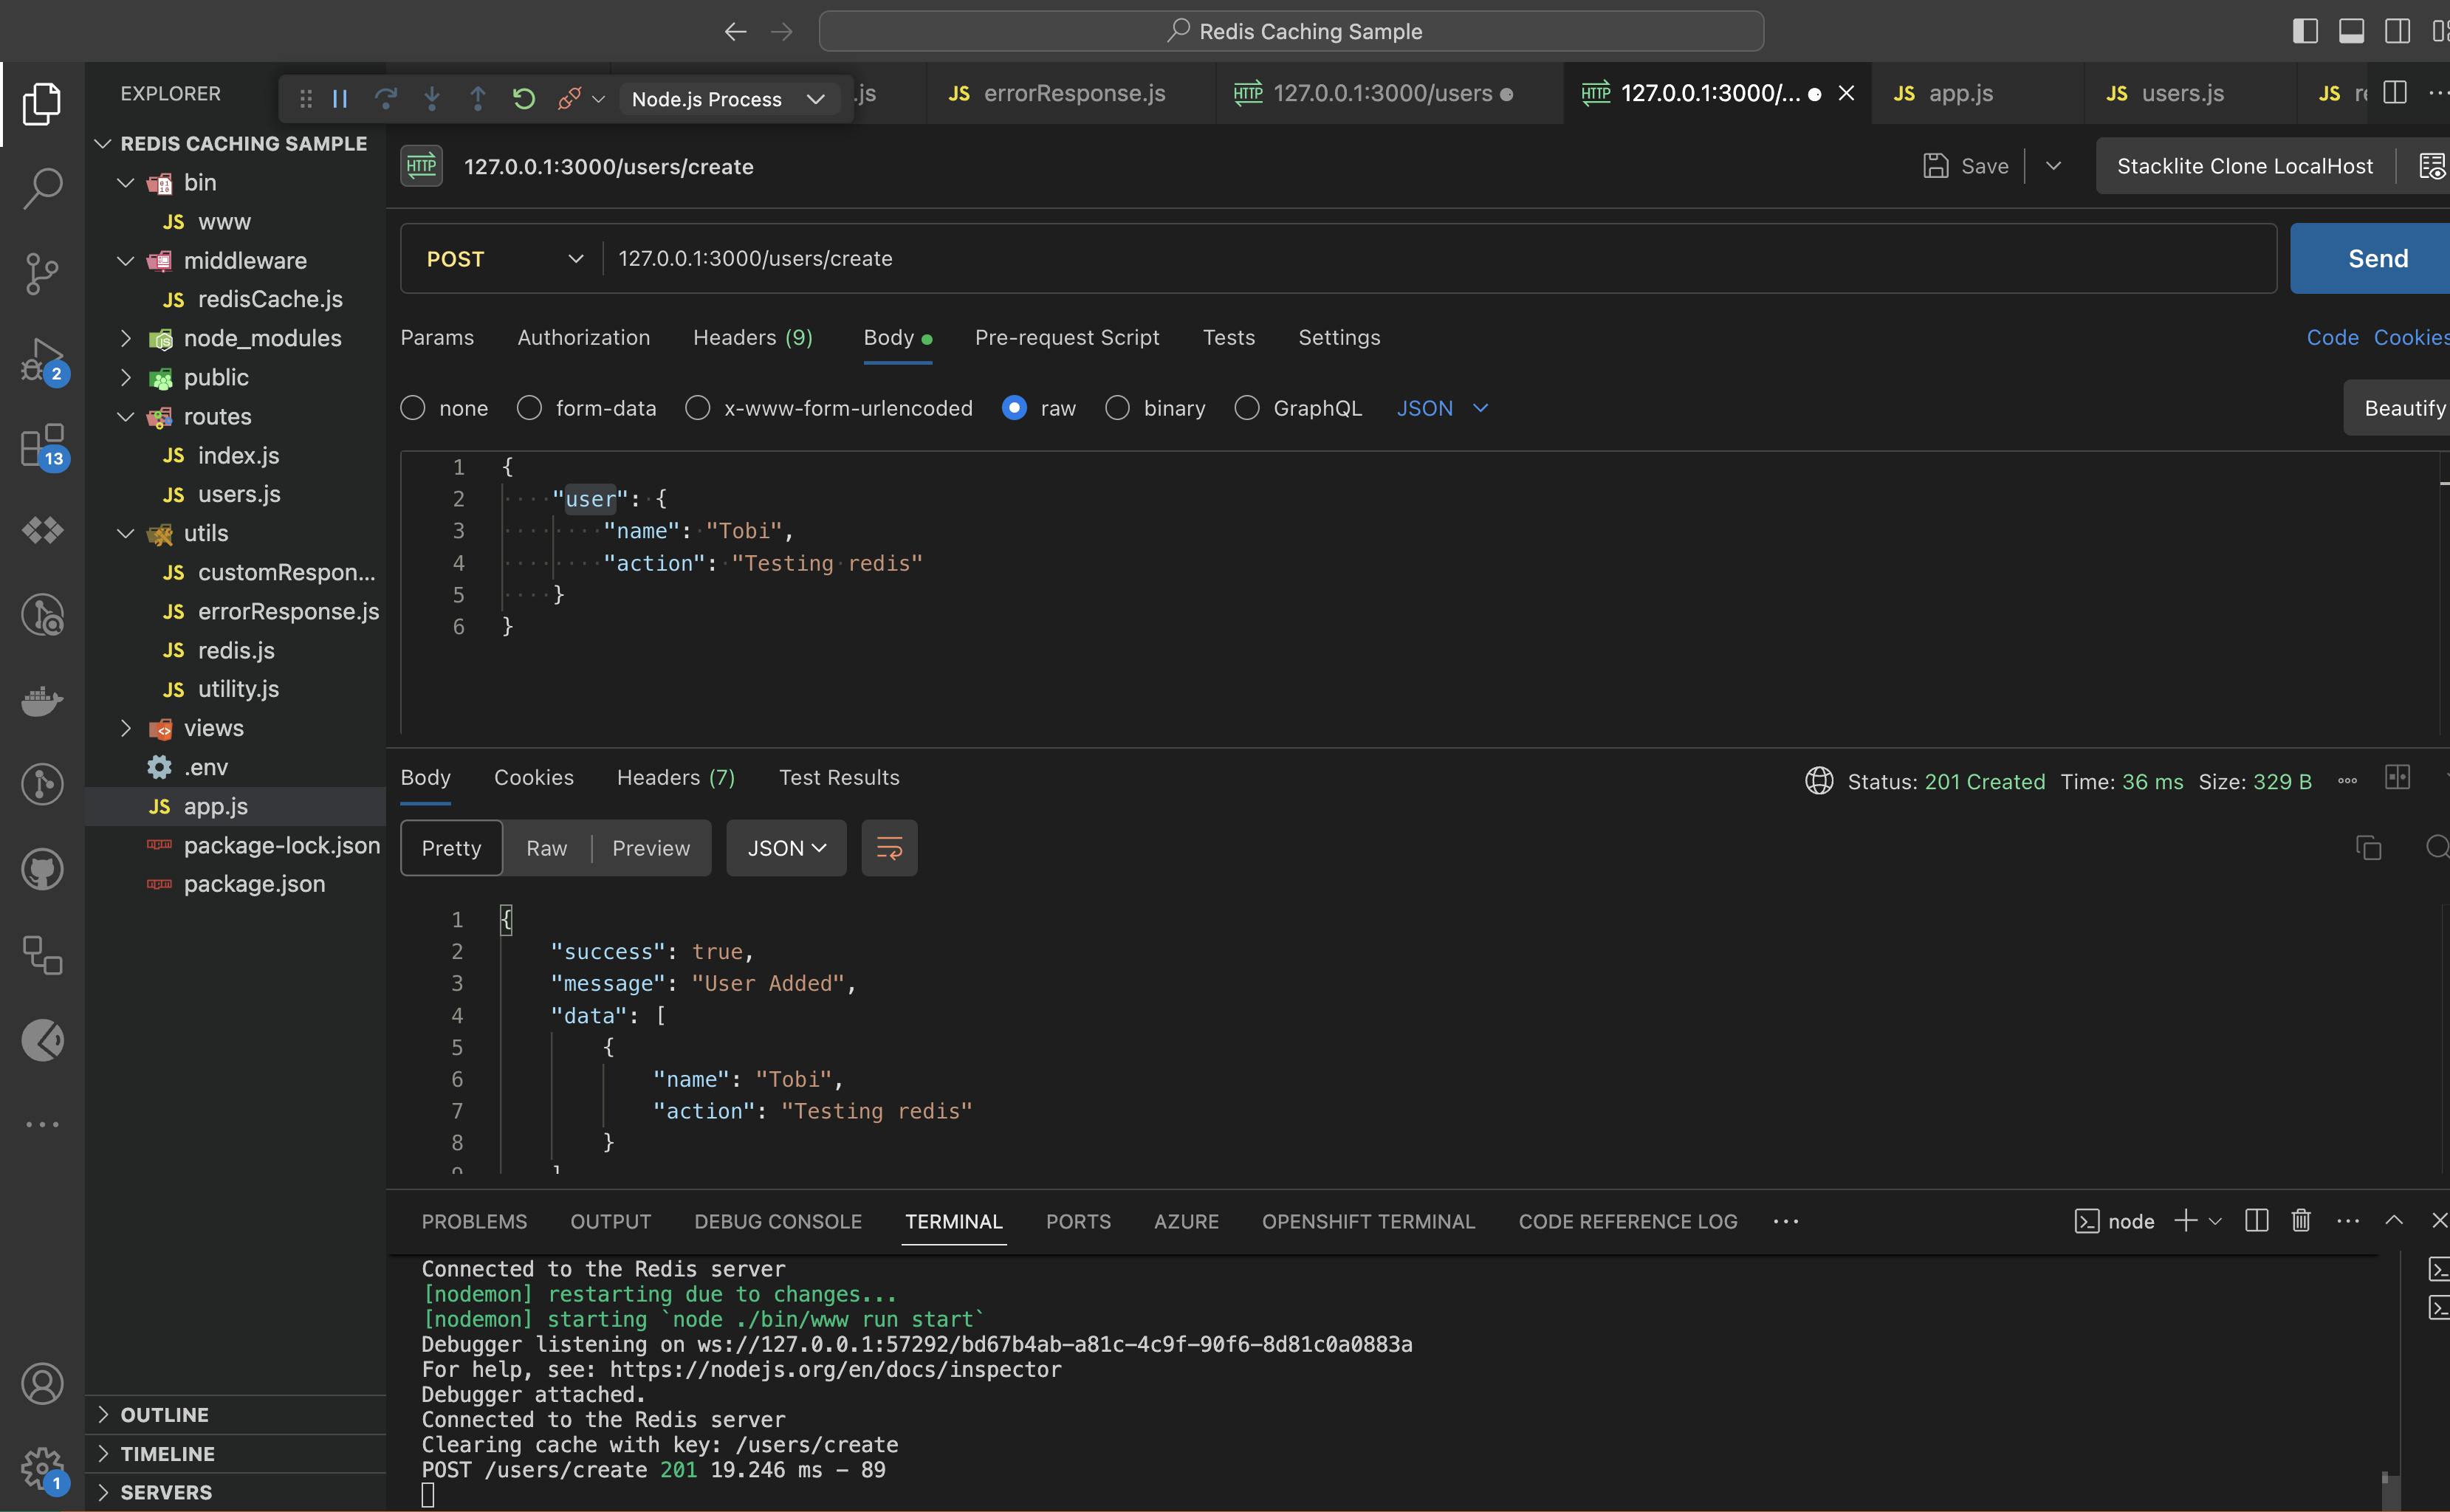
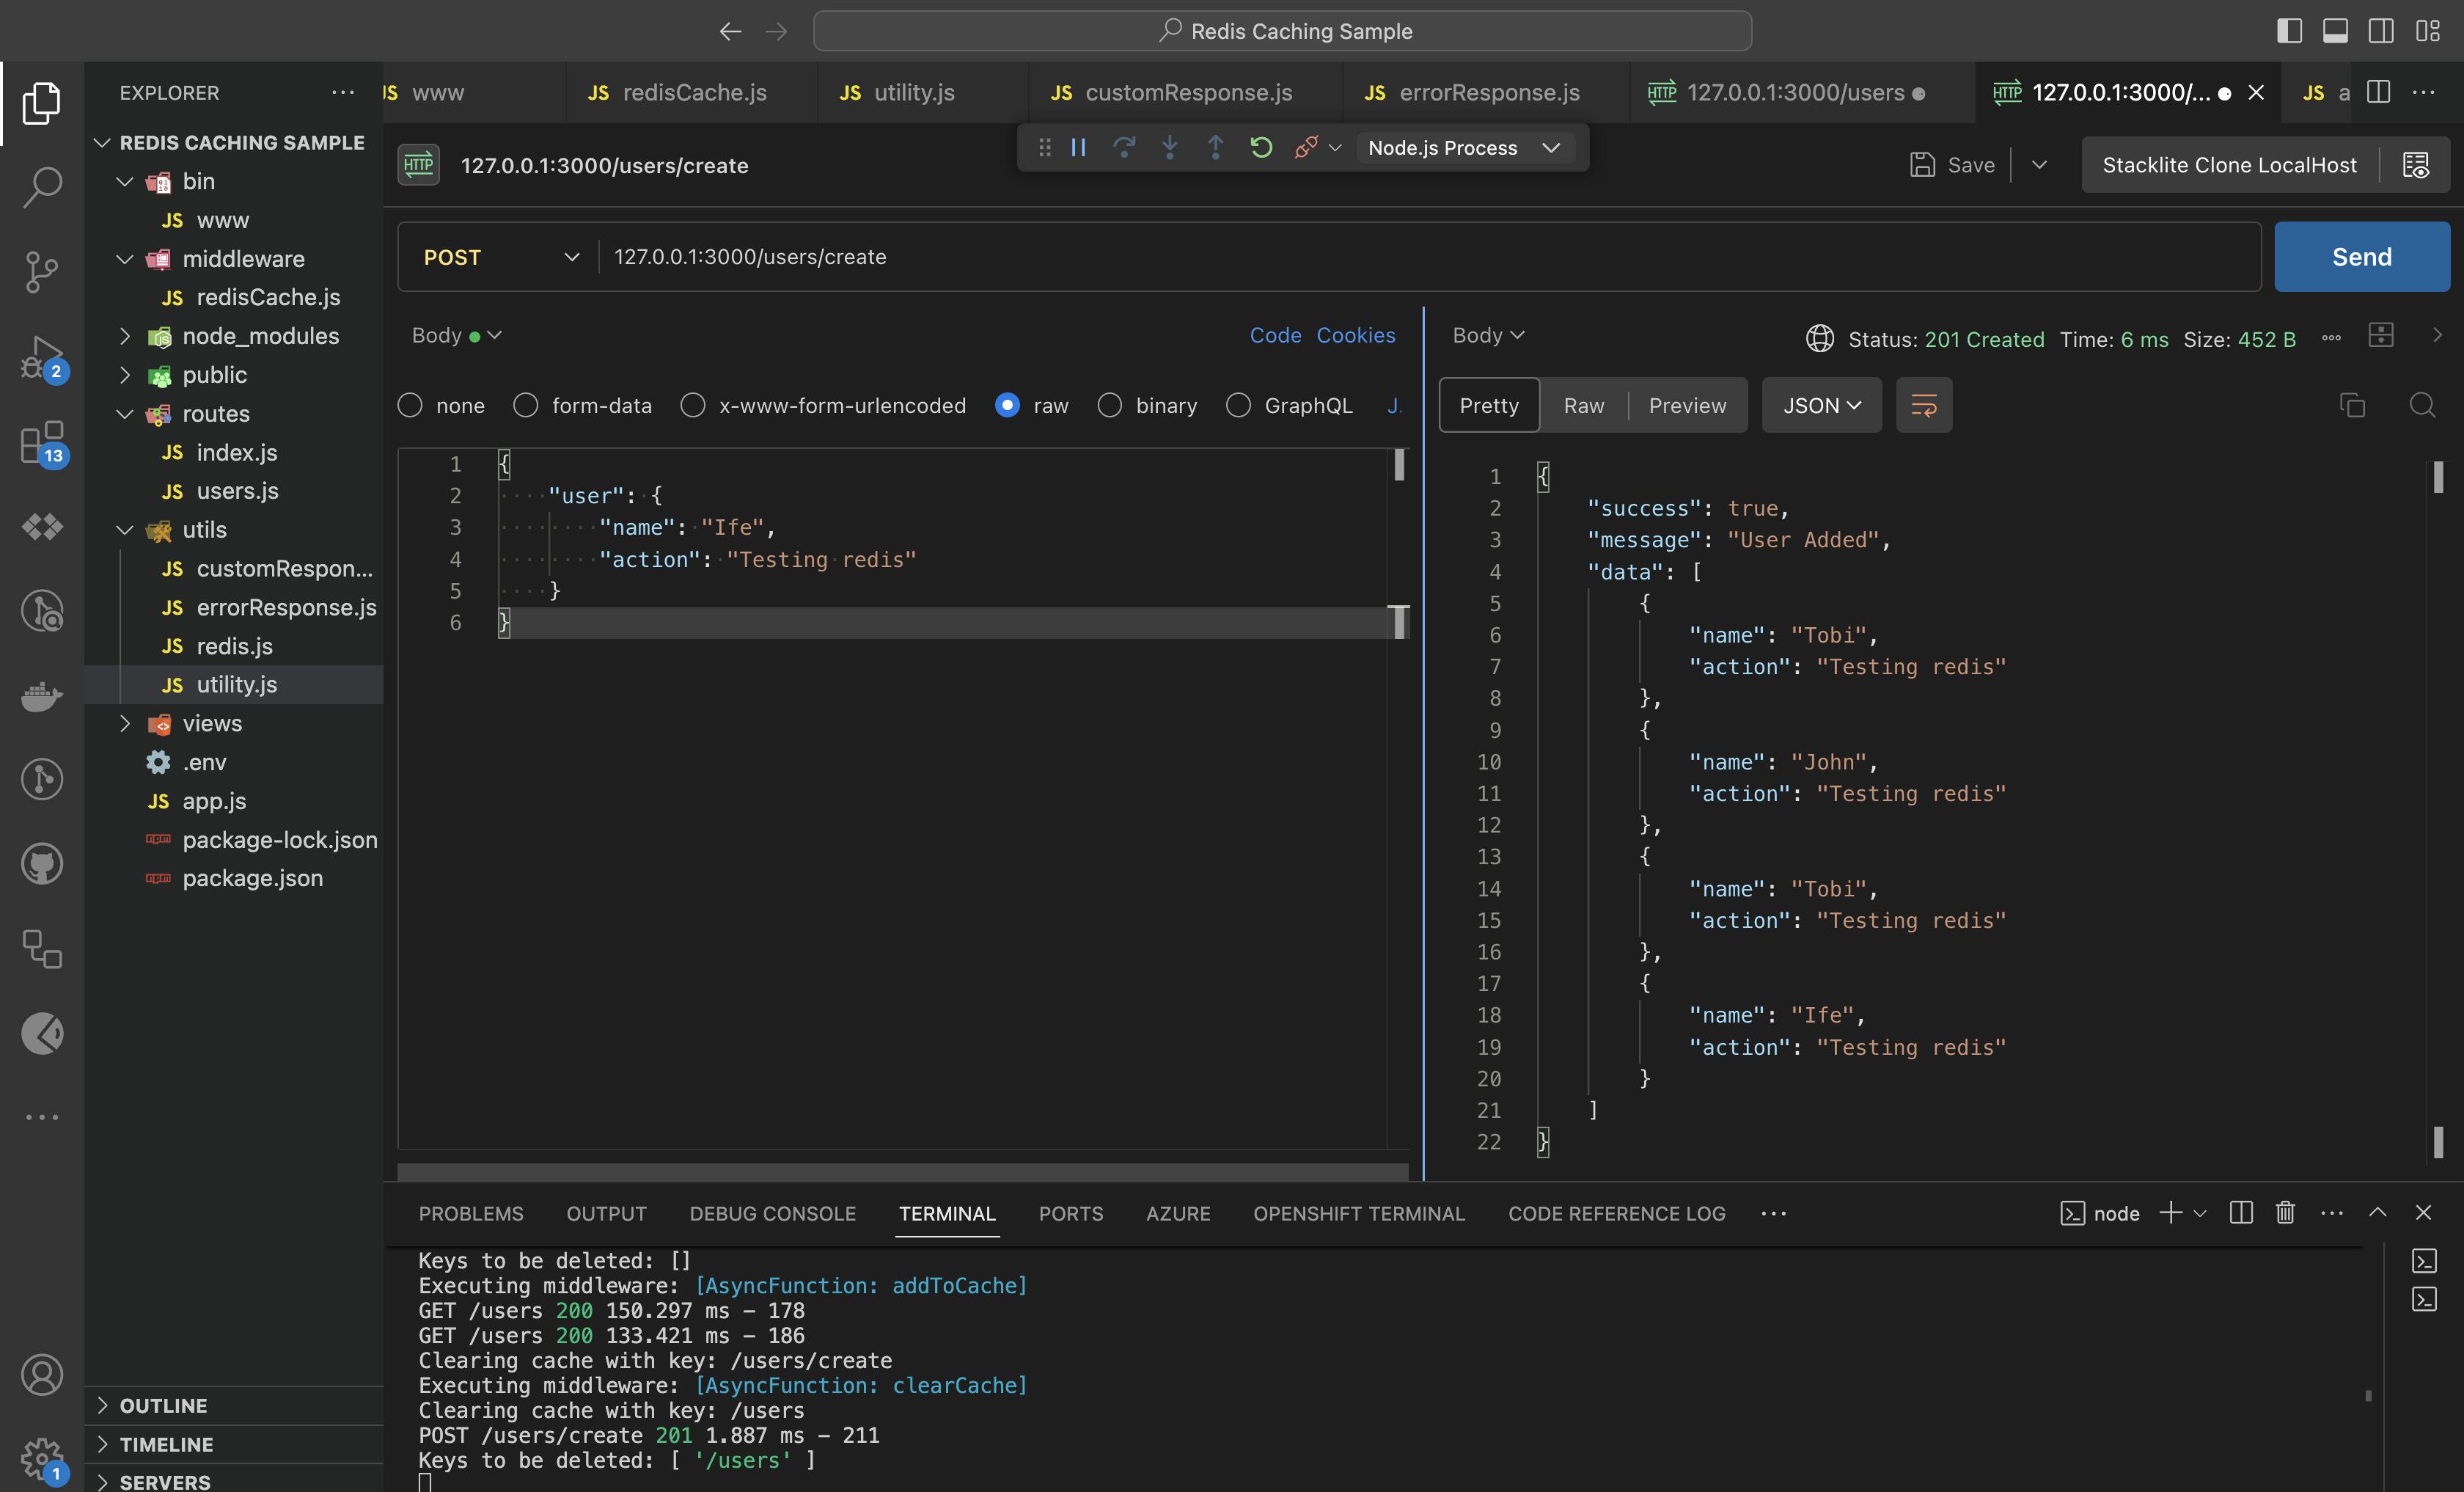
Observe that upon adding a user, the expected behavior is observed, and the clear cache function is called as anticipated.
Fetching Current Users:
- We perform the first GET request to fetch users from the datastore (not the cache).You can confirm that the users are retrieved successfully from the data store as shown below.
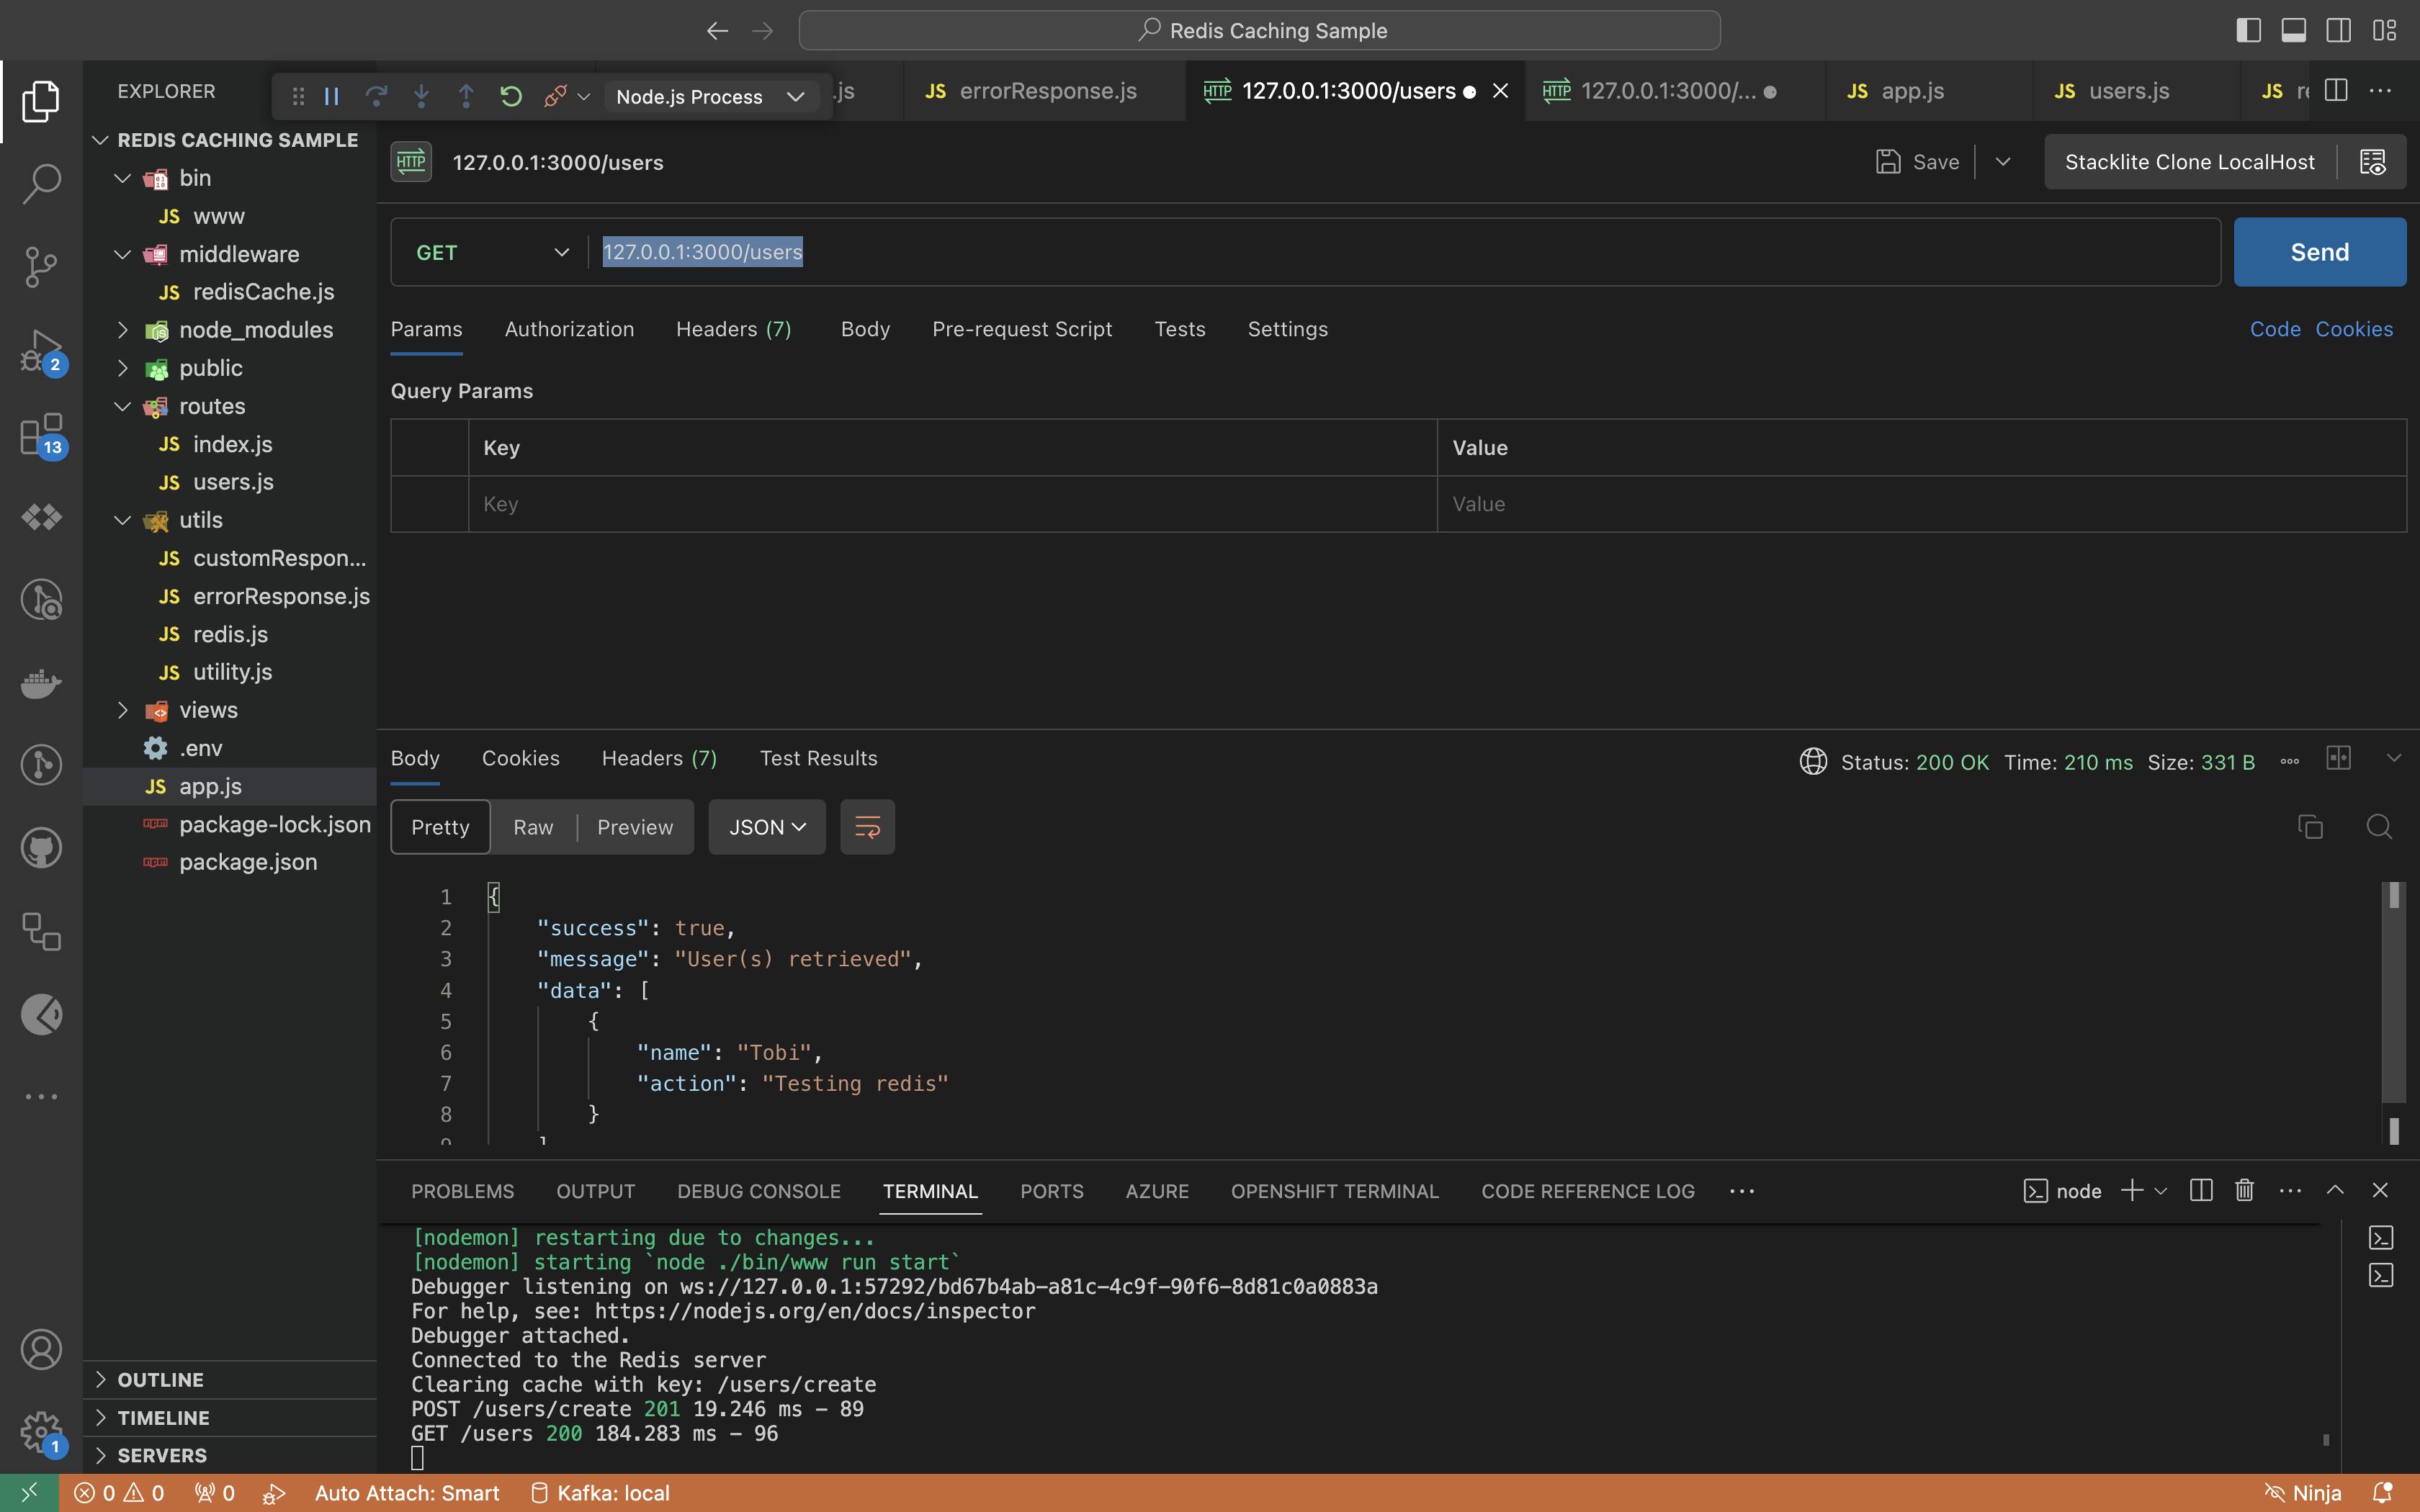
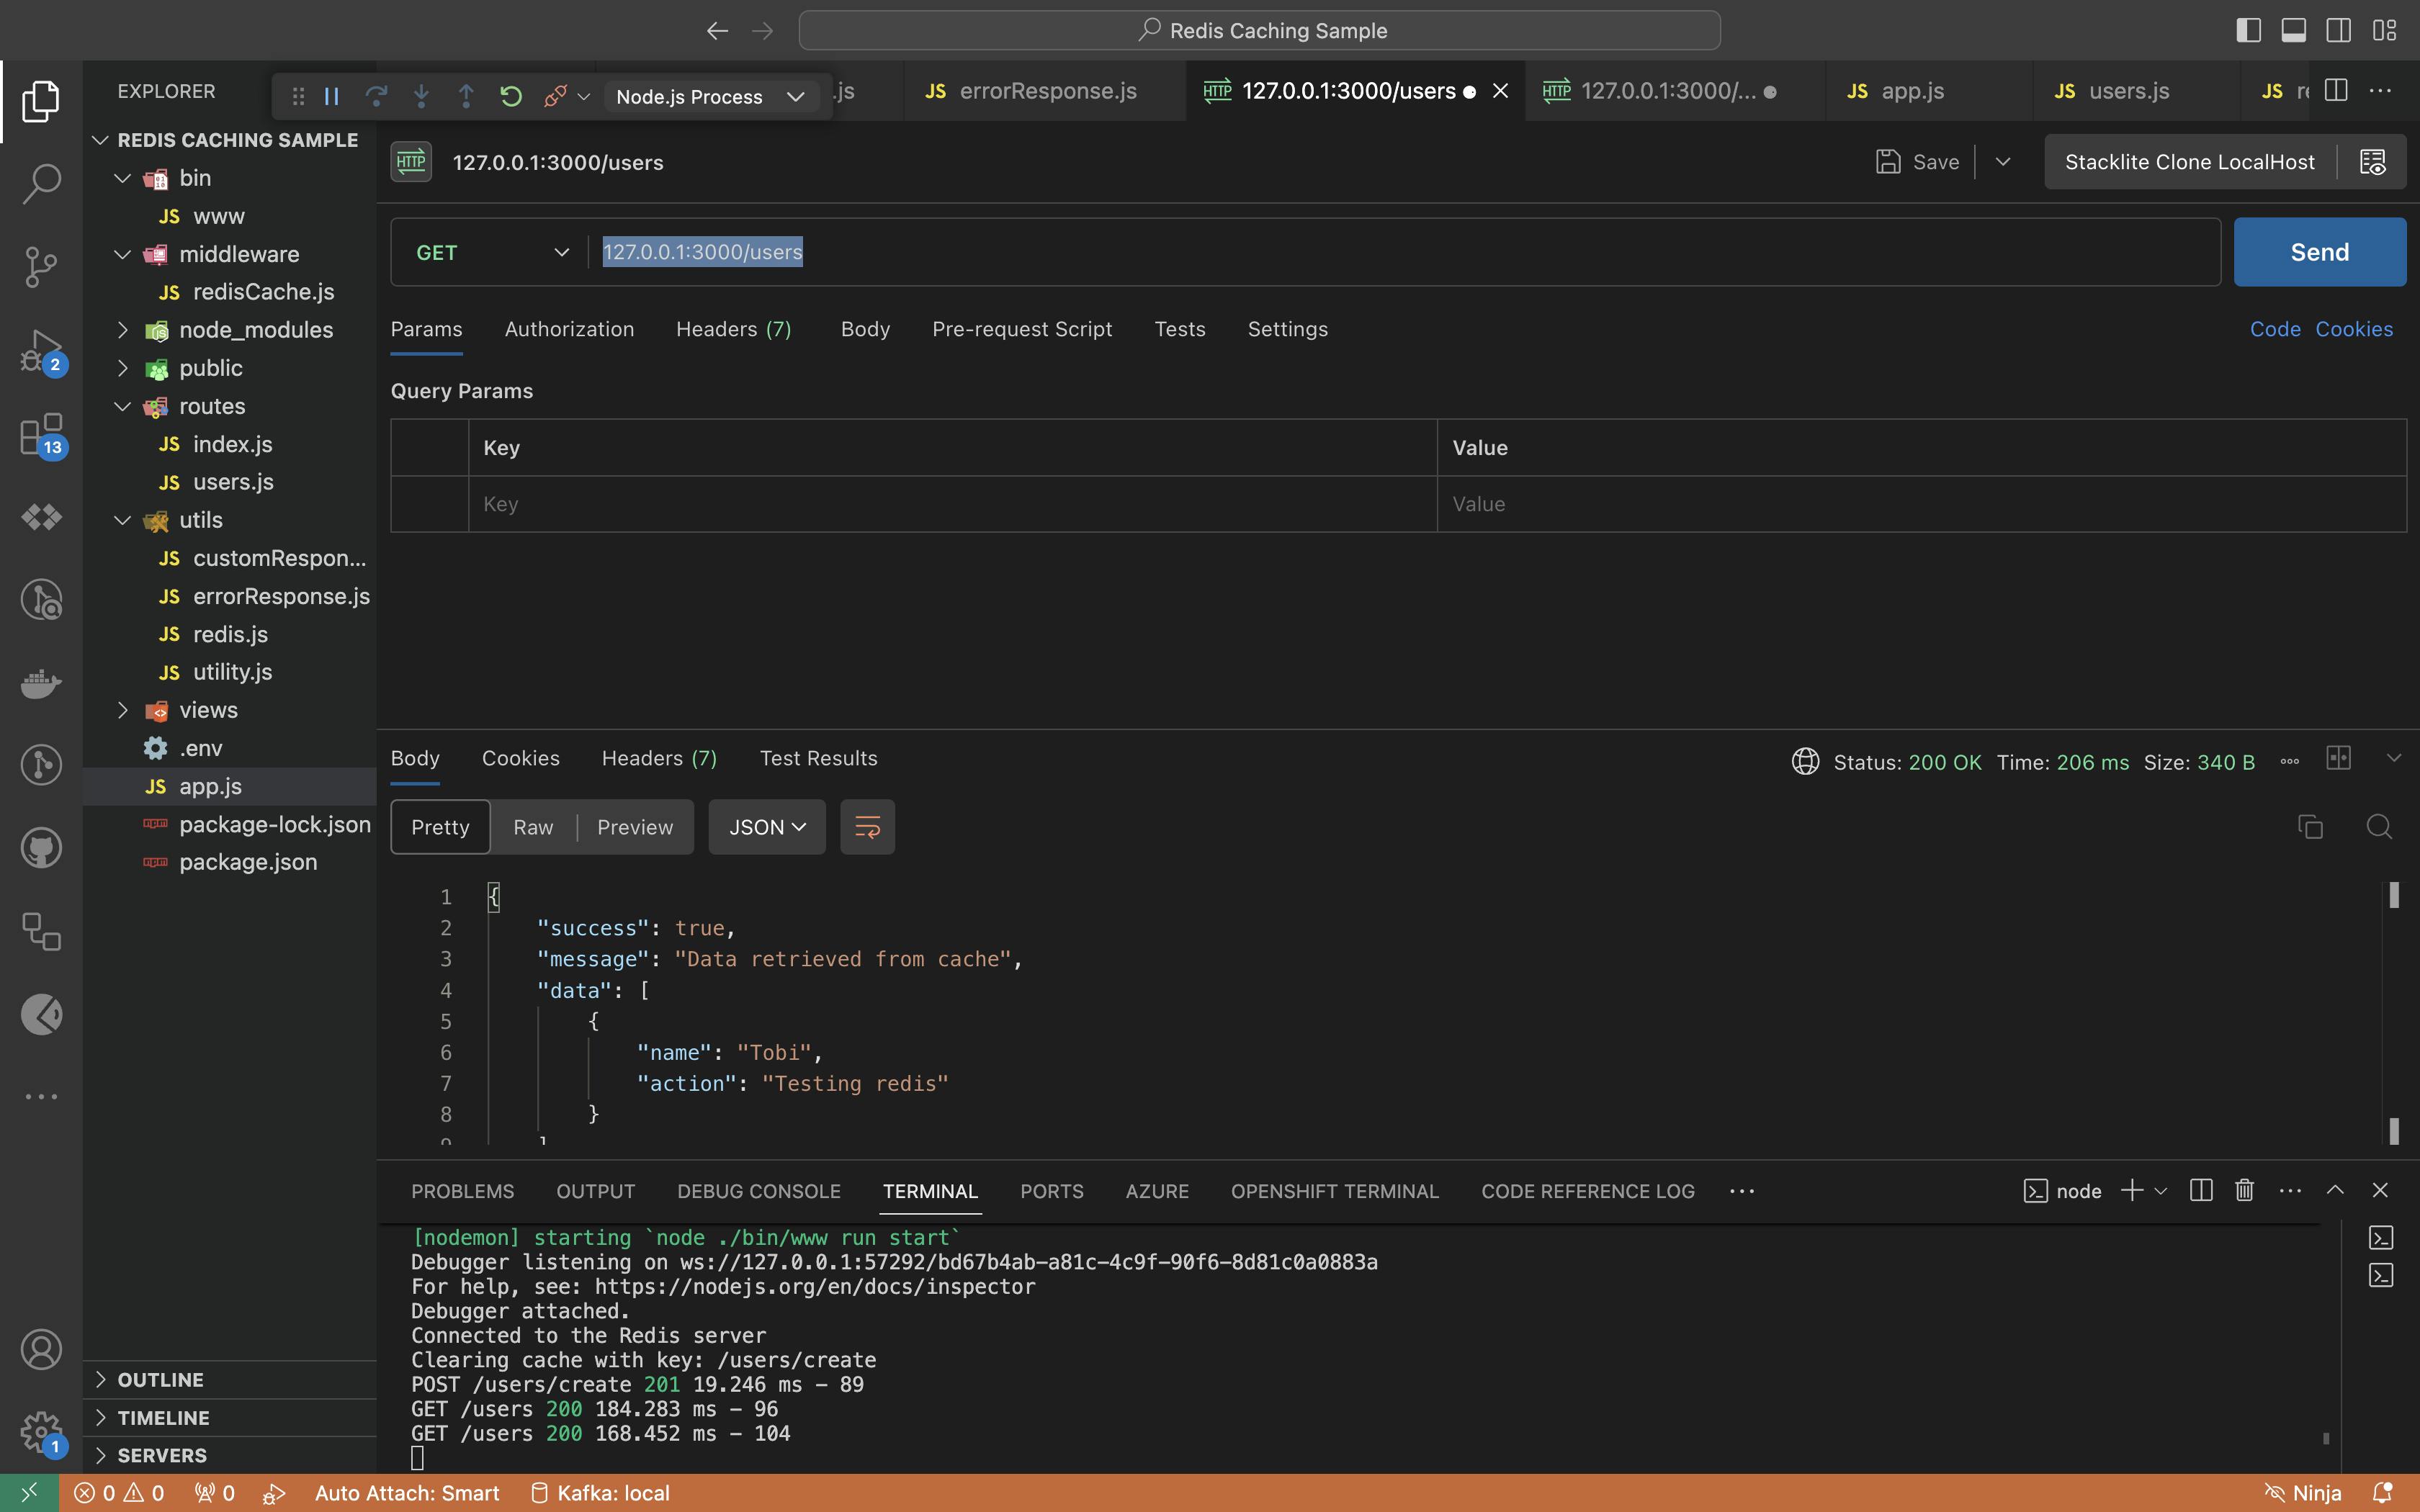
Subsequent Call Fetching from Cache:
- Executing a subsequent GET call to the same route. Note that this time, users are fetched from the cache, showcasing the caching mechanism in action. See image below 👇
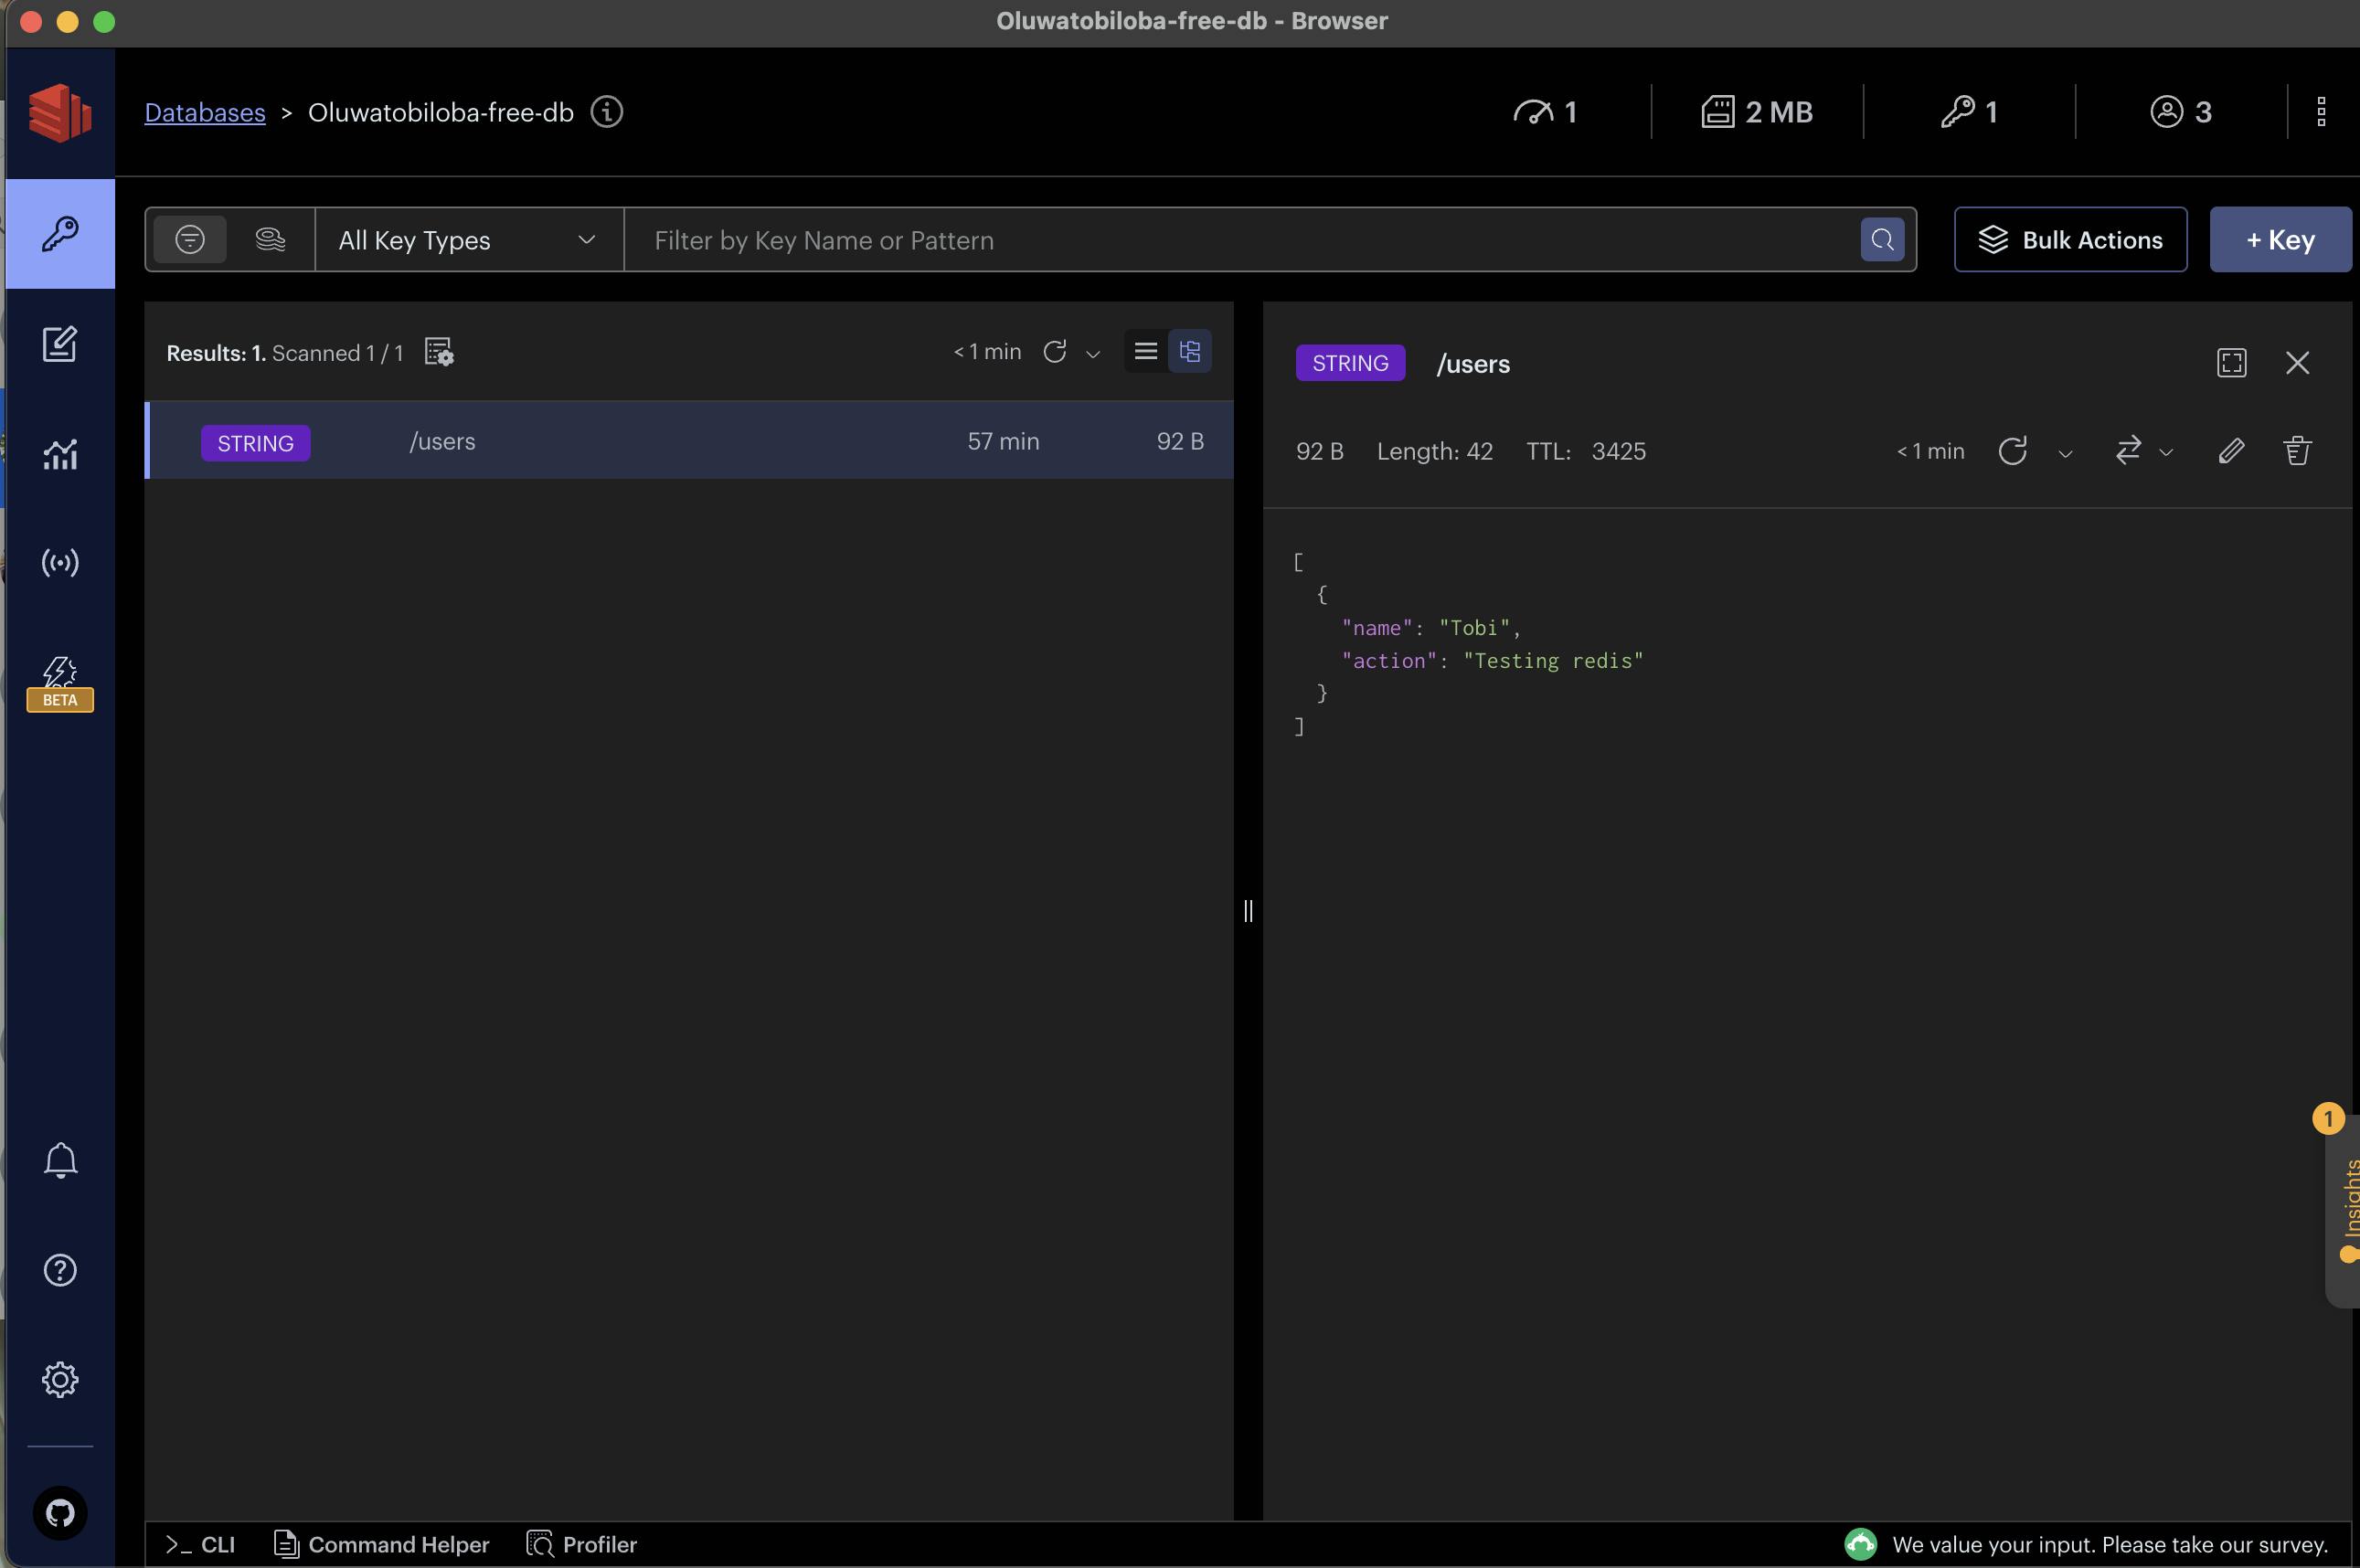
Viewing Cache Records:
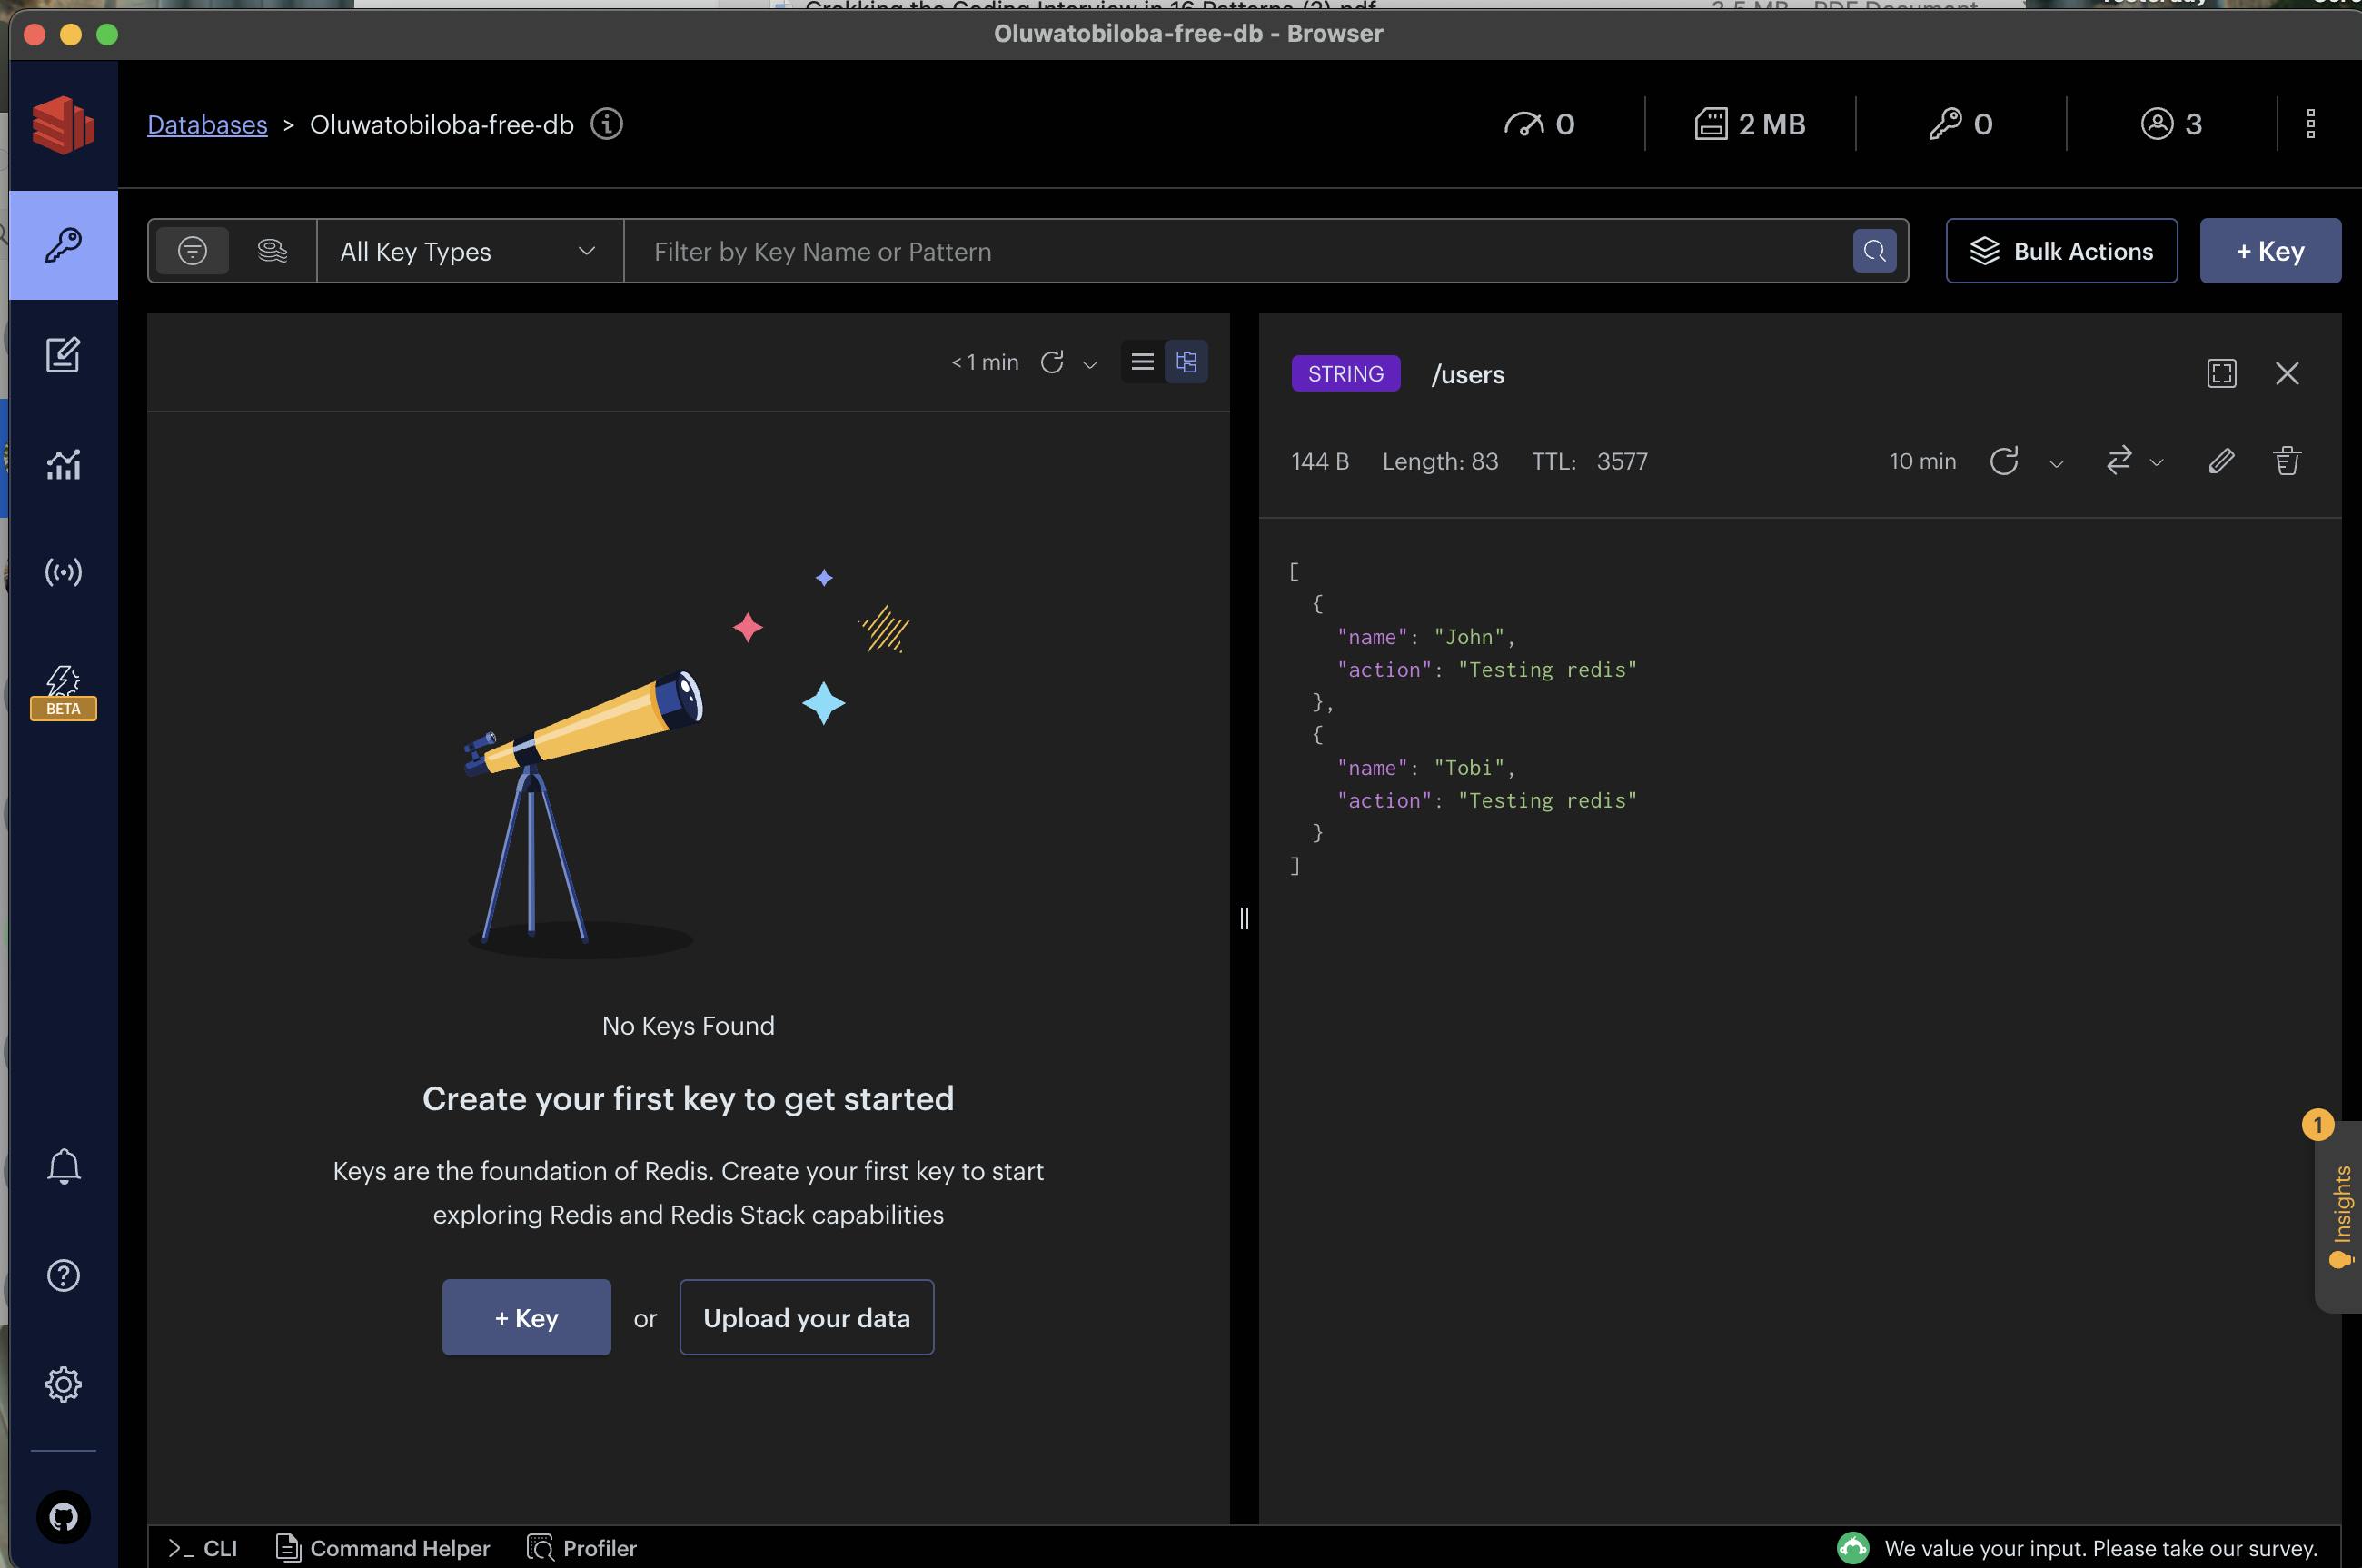
- We can verify that the record of users is visible in the cache using RedisInsights.
Attempting to Add a New User:
We then initiate the process of adding a new user as shown below 👇
We can observe from the terminal that the clearCache function is executed as a post-exec Middleware and the record is cleared.
Clearing Cache Due to Update:
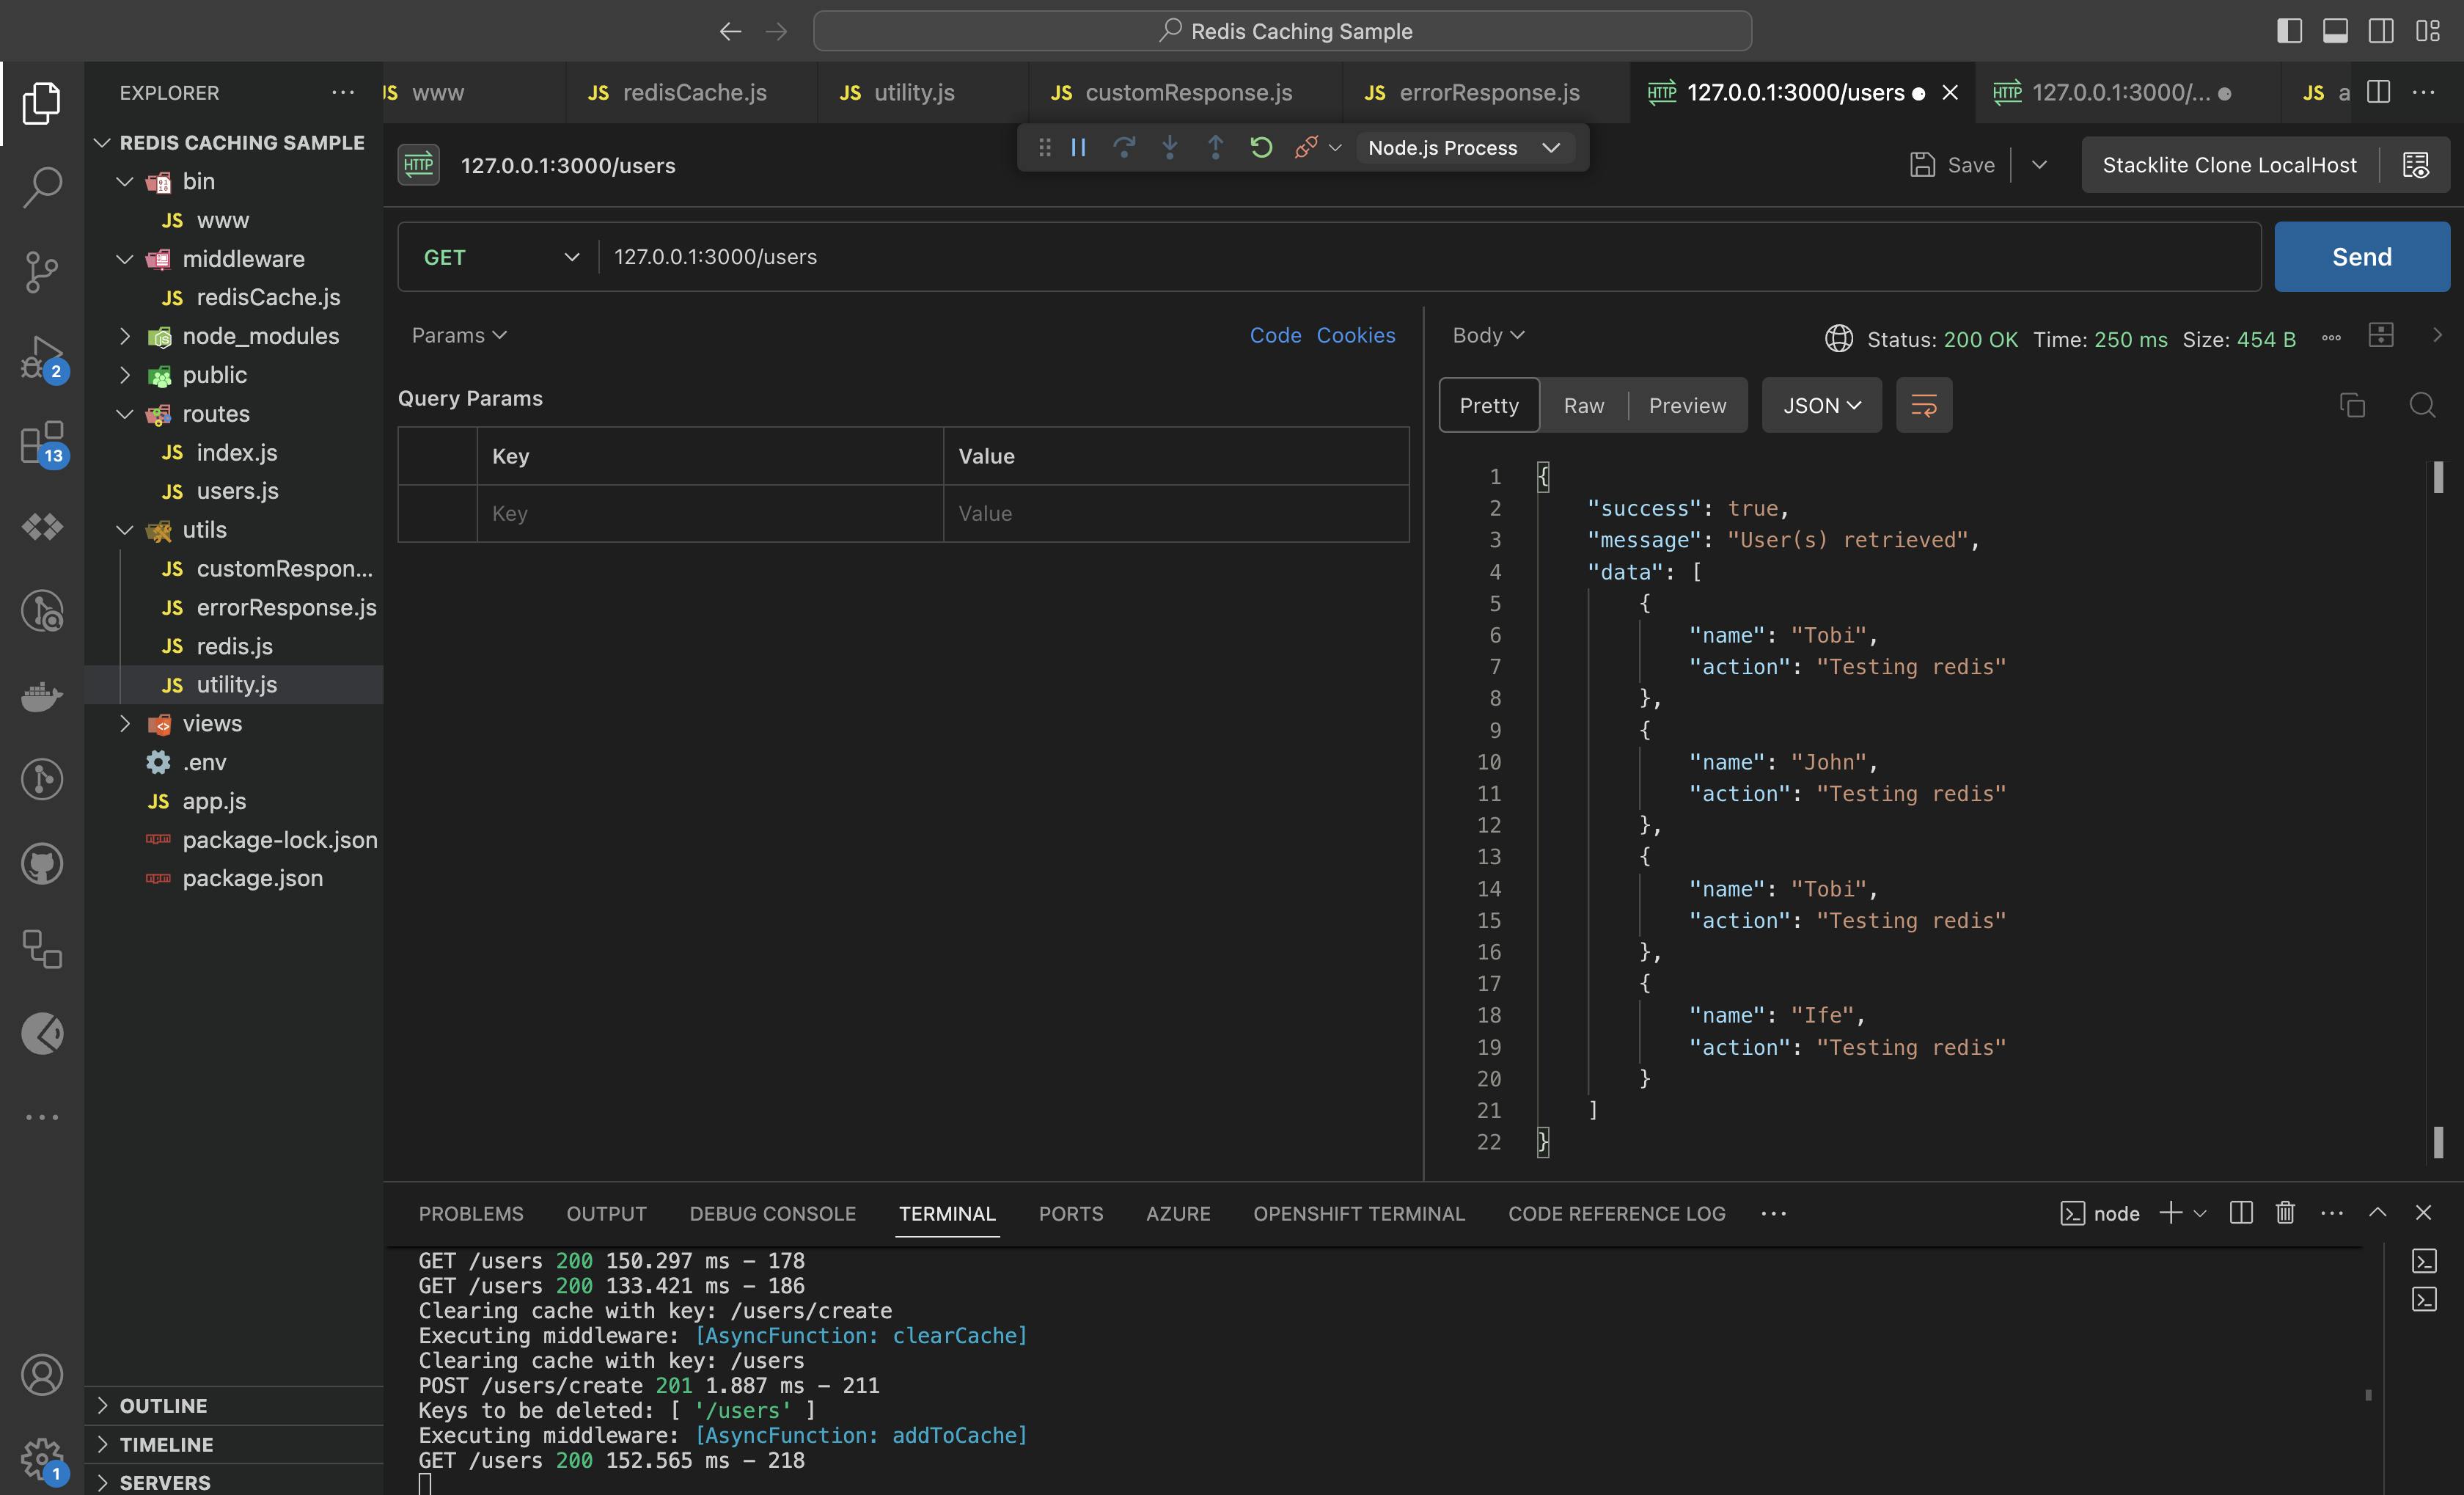
- Note that after the step above, the next GET call fetches from the datastore, as the cache was cleared due to the update.
Subsequent GET Populating Cache Again:
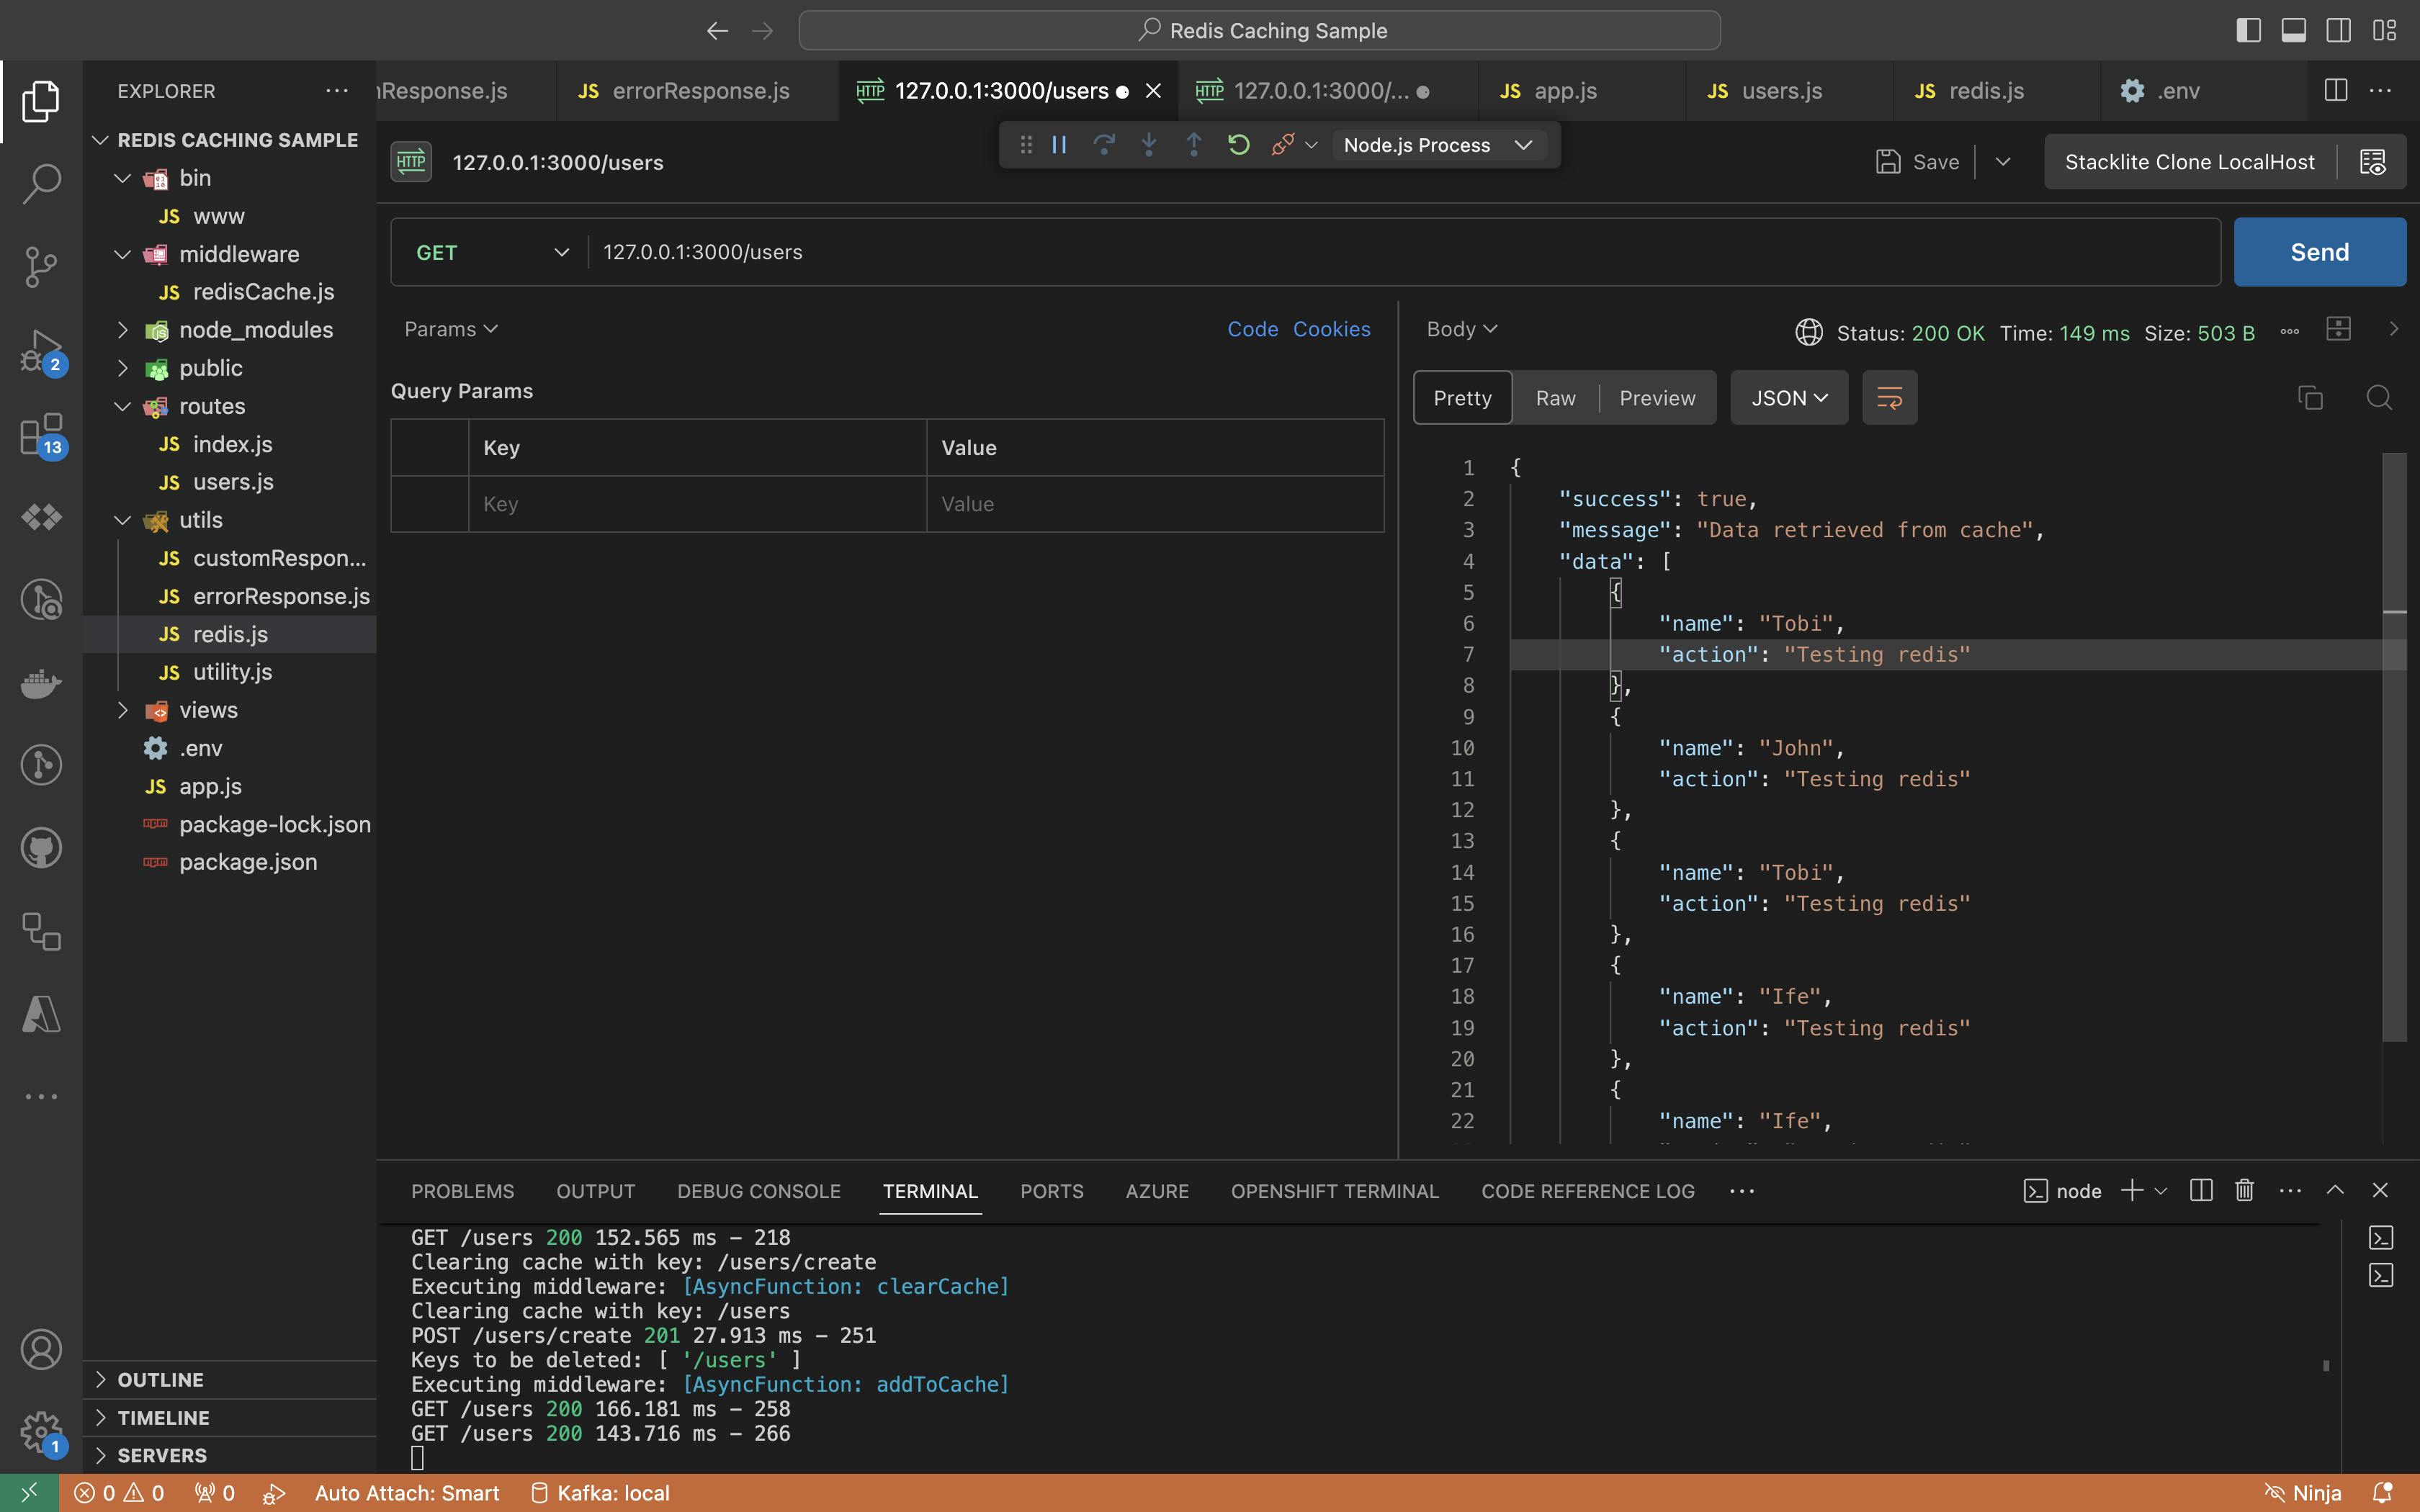
Performing another GET call, we observe that users are now fetched from the cache again, demonstrating the caching cycle.
In Conclusion
In this article, we explore the integration of intelligent caching middleware into an Express application, utilizing Redis. Our focus is on enhancing the performance of the Express application by implementing a sophisticated caching system. This system not only boosts the overall efficiency of our application but also introduces a crucial layer of optimization, especially in scenarios marked by frequent data retrievals.
The adoption of Redis as our caching mechanism promises a significant reduction in response times, particularly when handling repetitive requests. The middleware plays a crucial role in orchestrating the caching lifecycle, guaranteeing the currency and accessibility of our data.
It is essential to acknowledge that, while caching enhances our application's performance, striking a delicate balance is paramount. The dynamic nature of evolving data requires a thoughtful approach to cache invalidation, and this middleware serves as a solid foundation for navigating this challenge.
It's been fun, hasn't it? 🚀
Demo Repo - https://github.com/oluwatobiiloba/Redis-Caching-Sample